Salesbot is a bot that can be programmed to complete certain actions. For example, if you have a client’s number, but haven’t corresponded with him yet, you can use Salesbot to initiate dialogue.
Here we talk about simple things: how to send a message using Salesbot to all customers who go to a certain stage of deals.
We also have a more interesting article: how to send a mailing list using a bot. There we not only send messages, but also set up Salesbot so that it reacts to the client’s response.
- How to create a bot
- How to set up a bot to send messages
- How to send a message with Salesbot buttons
How to create a bot
1. Go to “Leads” → open the necessary funnel → click “Setup” in the upper right corner.

2. Click on the empty box below the stage where the bot should act → select Salesbot
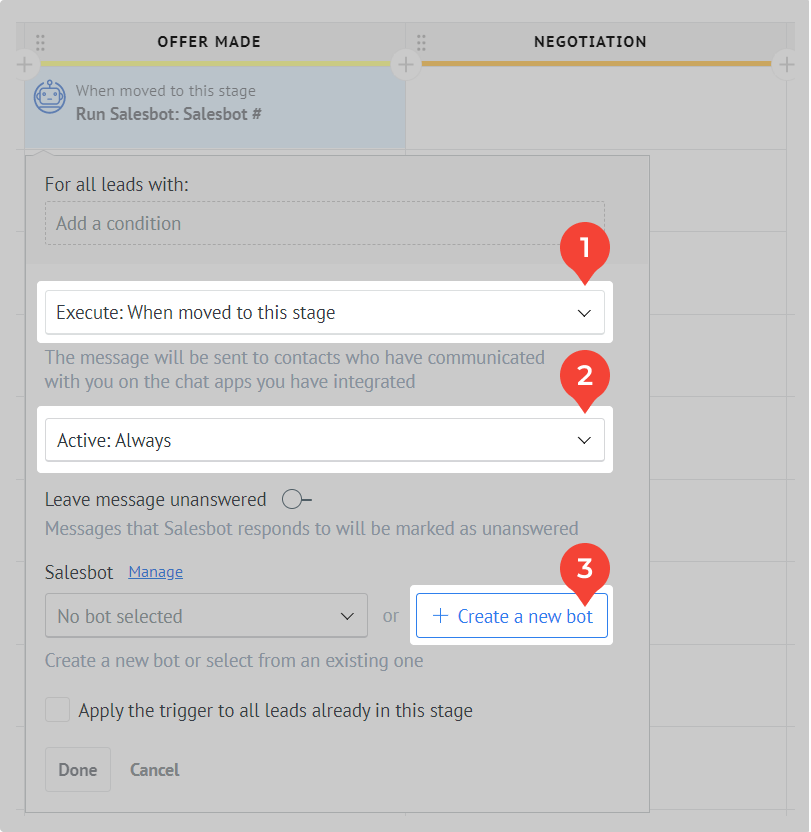
This will open the bot’s settings. Select:
- the event that will trigger the bot,
- time at which the bot will be triggered.
You can also add a condition for the bot to send a message to a contact from the lead.
In our example, the bot will be triggered when the lead has moved to the “Offer made” stage. It will be triggered always and for all leads that have been moved to the selected stage.
3. After that click “+ Create a new bot” → the bot editor will open.
How to set up a bot to send messages
You have created a bot. Now choose how you want to send the message:
- through the native steps of Kommo,
- through the Wazzup widget in Salesbot.
What is the difference between the widget and the native steps of Salesbot:
Salesbot steps send a message to the main contact in the card to all their numbers. For example, if you’ve texted a customer from two different WhatsApp numbers, Salesbot will send the same message to both numbers at the same time.
The Wazzup widget in Salesbot sends a message to the client number and messenger that you specify in the settings.
There is also a difference for WhatsApp Business API (WABA) users. Only the template code can be submitted through the Salesbot steps. The client will receive the message in the normal form, but it is not very convenient to fill in the variables in the code. And in our widget there is a template preview.
How to write using the Wazzup widget in Salesbot
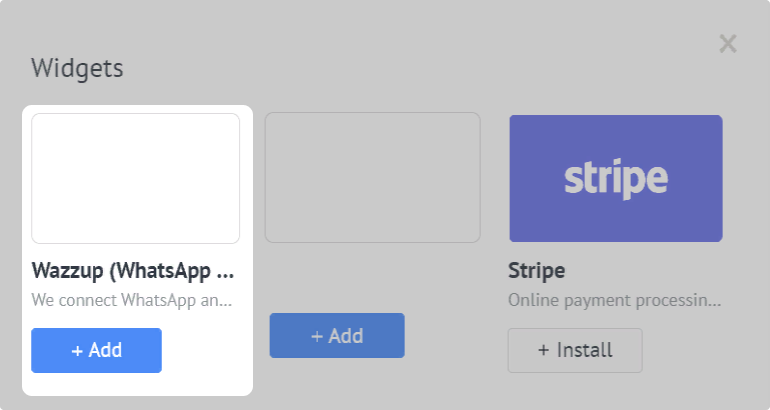
1. In the "Add next step" panel, select "Widget" → find Wazzup → "+ Add"
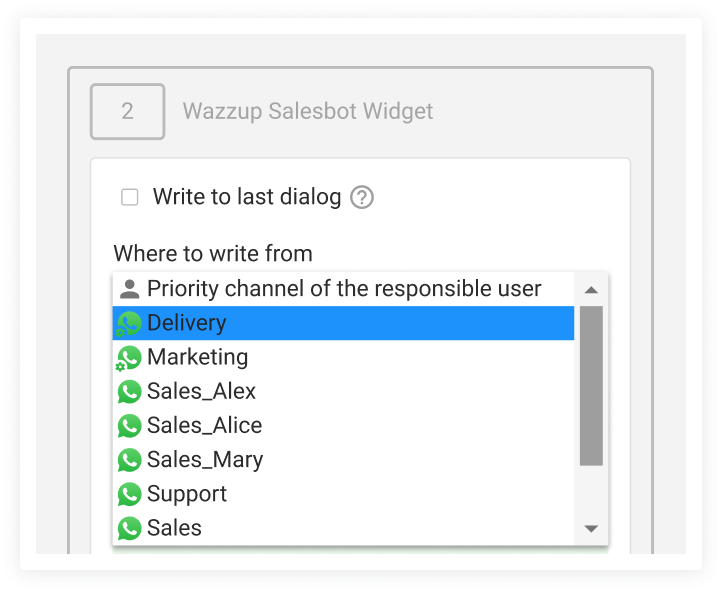
2. Choose a channel you want to write from. This will determine where the message will go.
If you check "Write to last dialog", the message will go to the dialog where the last incoming or outgoing message was, including automatic messages. It will be sent to the same client number or username, from the same channel.
If there is no dialog, the message will be sent from the channel you selected in "Where to write from if there are no dialogs". It will go to the main contact in the lead, if it is specified, or to the first number, username in the lead card.
If you don't check the box and select a channel in the "Where to write from" section, messages will go to the main contact in the lead, if it is specified, or to the first number, username in the lead card. It doesn't matter if there is any correspondence with the client.
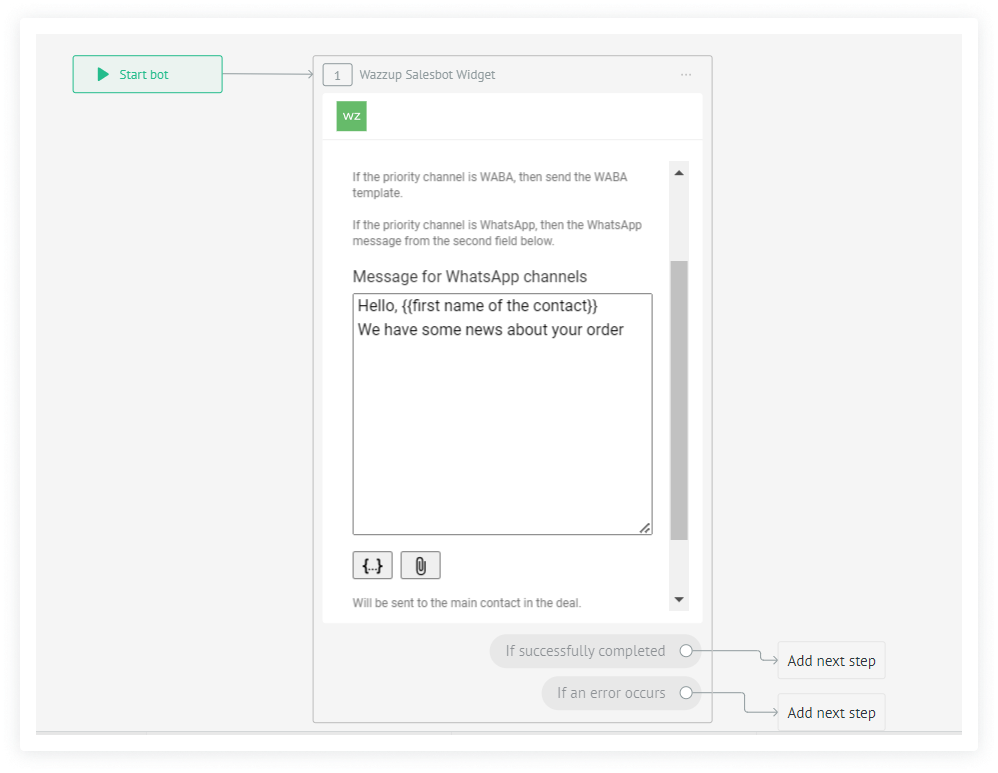
3. Write a message that will go to the customers.
From a WhatsApp or Telegram channel, you can send a text message with an attached image, video, document.
You can add a variable from CRM to the message. For example, customer name or order number. To do this, click on the {...} button below the message field.
To find an exact variable without manual scrolling through the entire list, you can use the search. To do this, start typing in the upper empty line the name of the variable or CRM element, for example, "Name".

From a WABA channel, you can only send a template. The list will show all the templates that are available in your personal account.
Fill in the variables. This can be done manually, or you can substitute data from CRM. To automatically pull data from Bitrix into the message, click on the arrow next to the required variable → select the field from which you want to take the information.
Attach a file if you have a template with media.
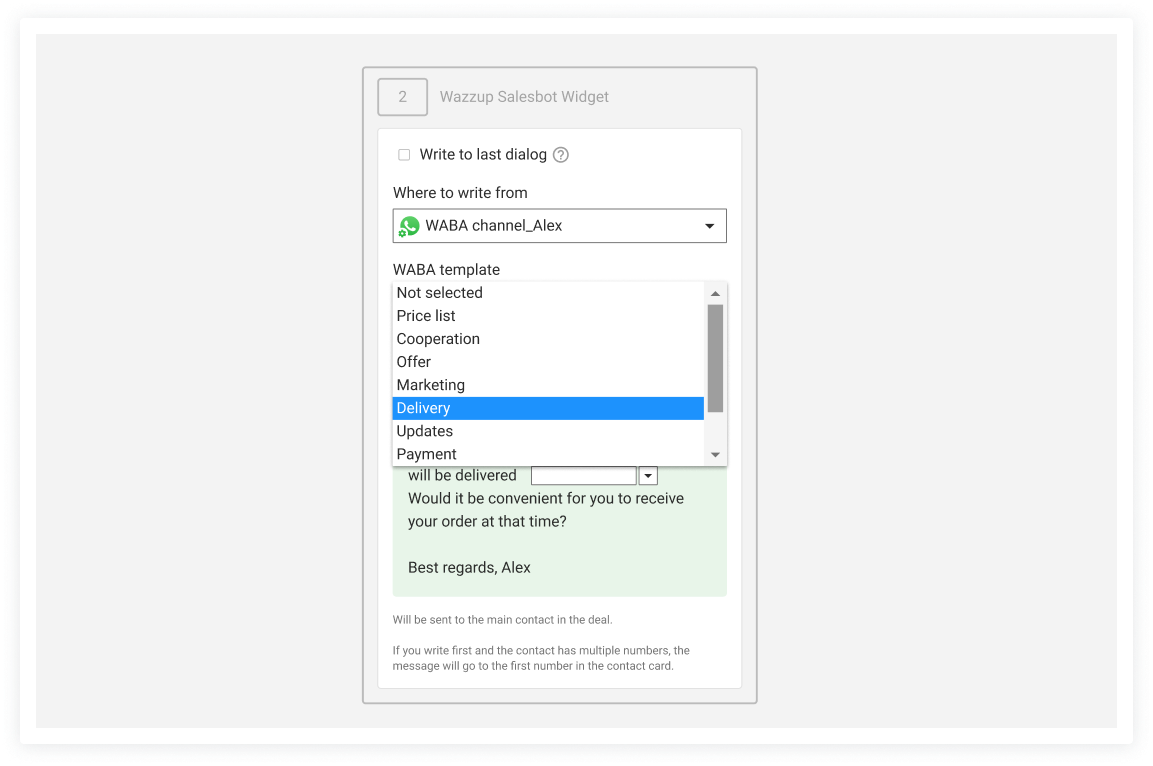
You can have both the message entry field for WhatsApp and Telegram channels and the list of WABA templates displayed. This happens if you have both types of channels, and want to send a message from the priority channel of the responsible one or to the last dialogue.
Fill in both fields. If the message will go from the WhatsApp or Telegram channel, Salesbot will recognize that you need to send the text from the "Message for WhatsApp or Telegram channel" field. If from the WABA channel — the bot will send the selected template. The messages will not go from two channels at once — only one
4. As the next step for both “If an error occurs” and “If successfully completed” select “Stop bot”.
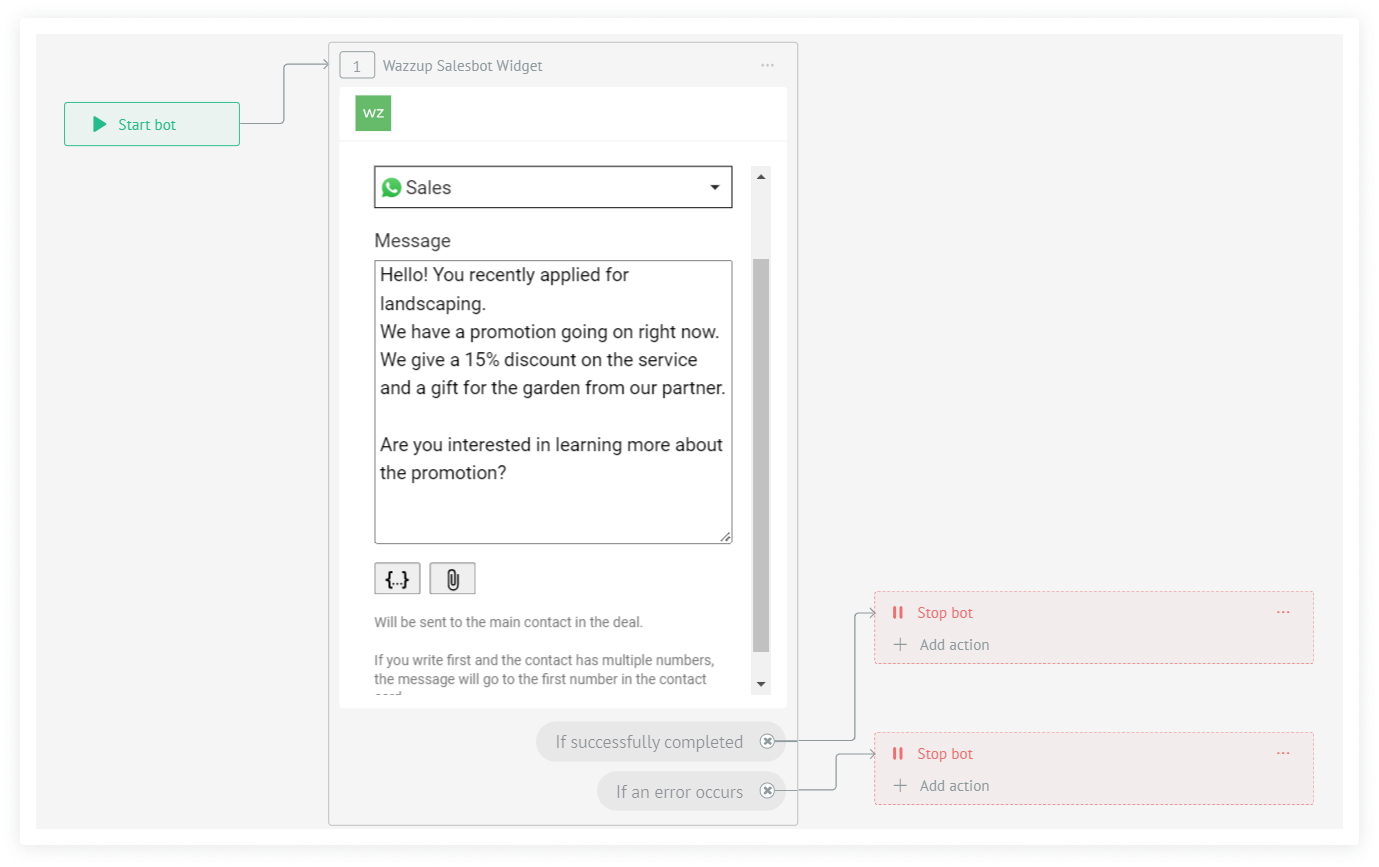
Done! You've set up Wazzup in Salesbot. Save your settings in the upper right corner.
How to write with Salesbot steps
1. From the "Add next step" list, select "Message". The bot will send a message, and if there is no chat with the client, it will create a new chat.
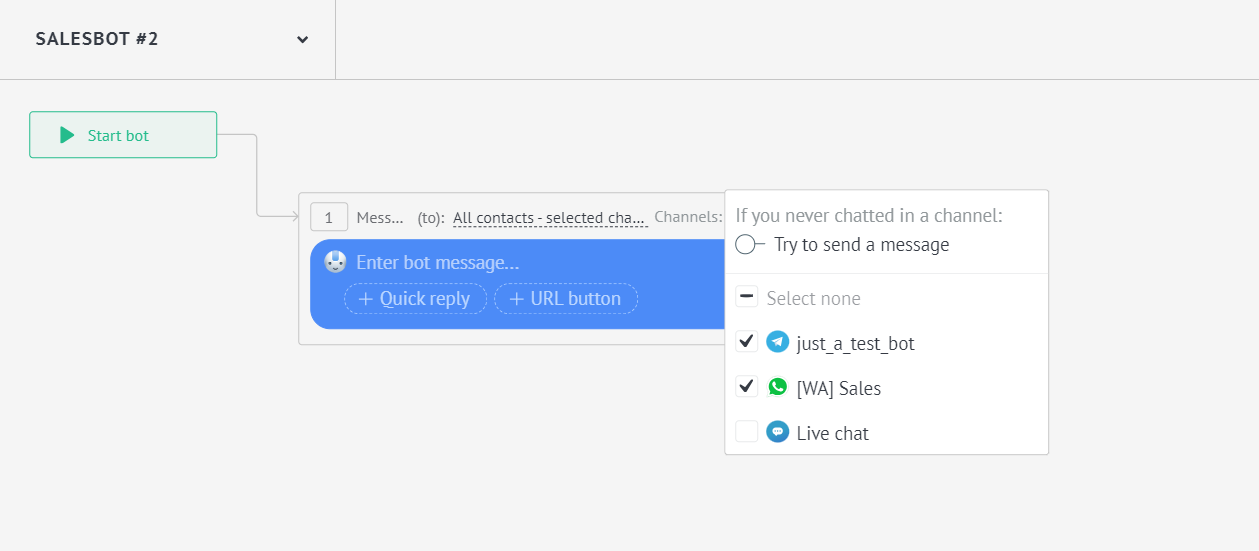
In the settings of the "Message" step, you can select a channel to send the message from. To do this, click on "Channels" and tick the necessary one. If not, the bot will send a message from all channels.
2. Write a message to the client.
3. Select "Stop bot" as the next step.
You get a bot like this:

How to send a WABA message with Salesbot buttons
From WhatsApp Business API (WABA) channels you can send messages with 1-10 buttons from Salesbot Kommo. The message will leave only if there is active 24-hour WABA conversation.
To start a conversation with a message with buttons, you need a template moderated by Meta — you can add no more than three buttons to it. You can create such a template and send it for moderation in your Wazzup account.
How to send a message with buttons from Salesbot
When setting up Salesbot, add the “Message” step at the right place in the process.
Write text and add buttons:
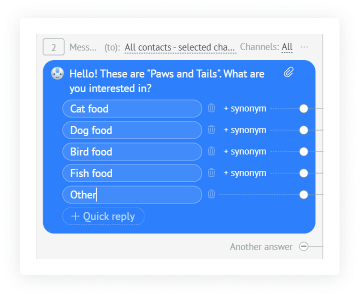
The button text contains no more than 20 characters.
A message with more than three buttons will be displayed in the client’s chat and in your Wazzup chat with the “Menu” button. Clicking on it will open a list of buttons.
A message with more than ten buttons will not be sent completely. The client will only receive the first ten response options.
