
'%3e%3cpath%20d='M10%2020C15.5228%2020%2020%2015.5228%2020%2010C20%204.47715%2015.5228%200%2010%200C4.47715%200%200%204.47715%200%2010C0%2015.5228%204.47715%2020%2010%2020Z'%20fill='%23F0F0F0'/%3e%3cpath%20d='M19.378%2013.4785C19.78%2012.3951%2020%2011.2234%2020%2010.0002C20%208.77701%2019.78%207.60529%2019.378%206.52197H0.621992C0.220039%207.60529%200%208.77701%200%2010.0002C0%2011.2234%200.220039%2012.3951%200.621992%2013.4785L10%2014.348L19.378%2013.4785Z'%20fill='%230052B4'/%3e%3cpath%20d='M9.9991%2019.9998C14.2987%2019.9998%2017.9642%2017.286%2019.3771%2013.478H0.621094C2.03402%2017.286%205.69945%2019.9998%209.9991%2019.9998Z'%20fill='%23D80027'/%3e%3c/g%3e%3cdefs%3e%3cclipPath%20id='clip0_586_4336'%3e%3crect%20width='20'%20height='20'%20fill='white'/%3e%3c/clipPath%3e%3c/defs%3e%3c/svg%3e)
'%3e%3cpath%20d='M10%2020C15.5228%2020%2020%2015.5228%2020%2010C20%204.47715%2015.5228%200%2010%200C4.47715%200%200%204.47715%200%2010C0%2015.5228%204.47715%2020%2010%2020Z'%20fill='%23F0F0F0'/%3e%3cpath%20d='M9.56445%209.99982H19.9992C19.9992%209.09725%2019.8789%208.22287%2019.6547%207.39111H9.56445V9.99982Z'%20fill='%23D80027'/%3e%3cpath%20d='M9.56445%204.78254H18.5315C17.9193%203.78363%2017.1366%202.9007%2016.2241%202.17383H9.56445V4.78254Z'%20fill='%23D80027'/%3e%3cpath%20d='M9.99828%2020.0001C12.3518%2020.0001%2014.5149%2019.1866%2016.2231%2017.8262H3.77344C5.48164%2019.1866%207.6448%2020.0001%209.99828%2020.0001Z'%20fill='%23D80027'/%3e%3cpath%20d='M1.46699%2015.2171H18.5315C19.023%2014.4152%2019.4041%2013.5386%2019.6548%2012.6084H0.34375C0.594414%2013.5386%200.975547%2014.4152%201.46699%2015.2171Z'%20fill='%23D80027'/%3e%3cpath%20d='M4.63219%201.56164H5.54348L4.69582%202.17746L5.01961%203.17391L4.17199%202.55809L3.32437%203.17391L3.60406%202.31309C2.85773%202.93477%202.20359%203.66313%201.66453%204.47469H1.95652L1.41695%204.86668C1.33289%205.00691%201.25227%205.14937%201.175%205.29395L1.43266%206.08695L0.951953%205.7377C0.832461%205.99086%200.723164%206.24973%200.624922%206.51398L0.908789%207.38773H1.95652L1.10887%208.00356L1.43266%209L0.585039%208.38418L0.0773047%208.75309C0.0264844%209.1616%200%209.57769%200%2010H10C10%204.47719%2010%203.82609%2010%200C8.02453%200%206.18301%200.573047%204.63219%201.56164ZM5.01961%209L4.17199%208.38418L3.32437%209L3.64816%208.00356L2.80051%207.38773H3.84824L4.17199%206.39129L4.49574%207.38773H5.54348L4.69582%208.00356L5.01961%209ZM4.69582%205.09051L5.01961%206.08695L4.17199%205.47113L3.32437%206.08695L3.64816%205.09051L2.80051%204.47469H3.84824L4.17199%203.47824L4.49574%204.47469H5.54348L4.69582%205.09051ZM8.60656%209L7.75895%208.38418L6.91133%209L7.23512%208.00356L6.38746%207.38773H7.4352L7.75895%206.39129L8.0827%207.38773H9.13043L8.28277%208.00356L8.60656%209ZM8.28277%205.09051L8.60656%206.08695L7.75895%205.47113L6.91133%206.08695L7.23512%205.09051L6.38746%204.47469H7.4352L7.75895%203.47824L8.0827%204.47469H9.13043L8.28277%205.09051ZM8.28277%202.17746L8.60656%203.17391L7.75895%202.55809L6.91133%203.17391L7.23512%202.17746L6.38746%201.56164H7.4352L7.75895%200.565195L8.0827%201.56164H9.13043L8.28277%202.17746Z'%20fill='%230052B4'/%3e%3c/g%3e%3cdefs%3e%3cclipPath%20id='clip0_1008_13251'%3e%3crect%20width='20'%20height='20'%20fill='white'/%3e%3c/clipPath%3e%3c/defs%3e%3c/svg%3e)
'%3e%3cpath%20d='M10%2020C15.5228%2020%2020%2015.5228%2020%2010C20%204.47715%2015.5228%200%2010%200C4.47715%200%200%204.47715%200%2010C0%2015.5228%204.47715%2020%2010%2020Z'%20fill='%23F0F0F0'/%3e%3cpath%20d='M0.34375%2012.6089C1.26711%2016.0348%203.96465%2018.7324%207.39059%2019.6557V12.6089H0.34375Z'%20fill='%23D80027'/%3e%3cpath%20d='M7.39055%200.344727C3.96465%201.26805%201.26707%203.96562%200.34375%207.39152H7.39059V0.344727H7.39055Z'%20fill='%230052B4'/%3e%3cpath%20d='M19.6562%207.39152C18.7329%203.96562%2016.0353%201.26805%2012.6094%200.344727V7.39156H19.6562V7.39152Z'%20fill='%23D80027'/%3e%3cpath%20d='M12.6094%2019.6557C16.0353%2018.7324%2018.7329%2016.0348%2019.6562%2012.6089H12.6094V19.6557Z'%20fill='%230052B4'/%3e%3cpath%20d='M12.608%209.99982C12.608%2011.4406%2011.4401%2012.6085%209.99934%2012.6085C8.55859%2012.6085%207.39062%2011.4406%207.39062%209.99982C7.39062%208.55904%209.99934%207.39111%209.99934%207.39111C9.99934%207.39111%2012.608%208.55904%2012.608%209.99982Z'%20fill='%23496E2D'/%3e%3cpath%20d='M7.39062%209.99982C7.39062%208.55904%208.55859%207.39111%209.99934%207.39111C11.4401%207.39111%2012.608%208.55904%2012.608%209.99982'%20fill='%230052B4'/%3e%3cpath%20d='M8.5332%208.6958V10.3262C8.5332%2011.1367%209.19016%2011.7936%2010.0006%2011.7936C10.811%2011.7936%2011.468%2011.1367%2011.468%2010.3262V8.6958H8.5332Z'%20fill='%23D80027'/%3e%3c/g%3e%3cdefs%3e%3cclipPath%20id='clip0_1008_13324'%3e%3crect%20width='20'%20height='20'%20fill='white'/%3e%3c/clipPath%3e%3c/defs%3e%3c/svg%3e)


How to add an Automation rule
Correspondence with clients in WhatsApp, Viber and Telegram can be automated with the help of robots. When a new lead or deal is created or when a deal moves to a certain stage, a robot will create a chat with the client and send a message to it.
Robots are one of the ways of automation in Bitrix24. They perform simple actions and are available on all plans.
If you have the "Professional" or "Enterprise" plan, you can also use Business Processes. With them you can realize more complex automation chains - not only for transactions, orders, leads and tasks, but also for other entities. Check out, how to send Wazzup messages through Business Processes
Which robots can send messages
There are two ways to send a message: using the Bitrix24 robot or the Wazzup robot.
In the Bitrix24 robot, you can write a message and choose when and under what conditions it will go away.
Our robot has all the features native from Bitrix24. And you can also select channels for sending, write to the last dialog, conveniently send WABA templates and attach media without links.
Both options are good if you want to automate something simple, like writing to a client in WhatsApp "Thank you for the order" when the deal is closed. But it's better to use the Wazzup robot — there are more possibilities for customization.
How to add and customize a robot
The first steps of customization are the same — you need to add a robot.
1. Go to the CRM section on the left panel of Bitrix24. On the right above the funnel stages, click on the robot icon.

2. In the "Robots" section, click "+" at the desired process step. Or click on the green "Create" button and select a process stage.
3. Select the robot: "Other" → "Wazzup (WhatsApp, Telegram, WhatsApp Business API and Instagram) Automated messages" → "Add". After the first use, the robot will appear in "Recents" and you can add it from there.
4. The robot will open.
If you have channels in Open Channels, there will be a "Display message in Open Channel" setting at the beginning. Leave a checkmark if you need to save a message in the Open Channel that leaves through the activity.
Messages sent from Wazzup chats or Wazzup activity are displayed in Open Channels as incoming. If you decide to pull outgoing activities from the activity to Open Channels, you will receive notifications about the messages that you sent to the client.
For example, the message was sent to 15 clients → the Open Channel will display 15 dialogues in which the messages went → you will receive 15 notifications about new messages.
5. Choose how you want to write to clients:
Write to last dialog. If you select "Write to last dialog", the message will go to the dialogue that had the last incoming or outgoing message, including automatic. It will go to the same number and from the same channel.
If there is no last dialogue, then the message will be sent:
- from the channel that was selected in the "Where to write from if there are no dialog" section,
- to the number or username from the Bitrix24 field that was selected in the "Where to write if there are no dialog".

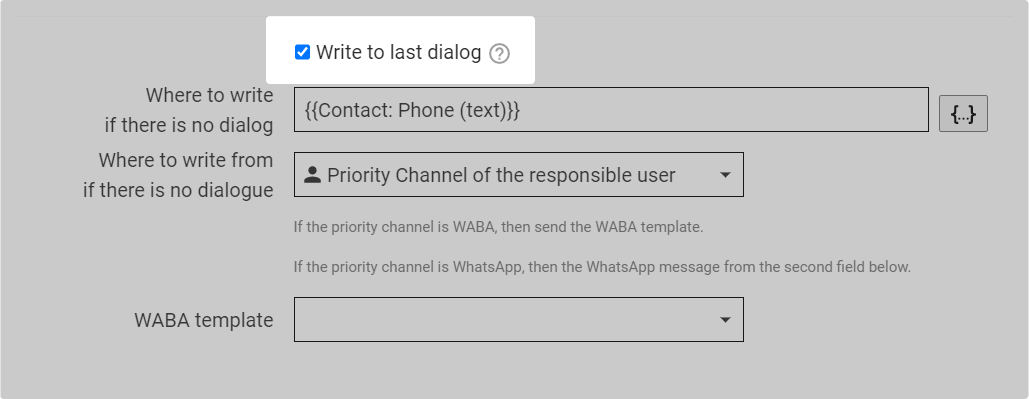
Write from a specific channel to a number or username from a specific Bitrix24 field:
- in the "Where to write from" field, select the channel from which messages should be sent;
- in "Where to write" select the Bitrix24 field from which you need to take contact information to send a message.

You can add multiple CRM fields to "Where to write" to ensure that if the first field is empty, the message will be sent to the number or username in the next field.
If you add multiple variables, do not separate them with a comma — otherwise, the message will not be sent. Example of how to correctly specify variables:
{{Contact: Phone (text)}} {{Contact: TelegramUsername_WZ}}
The message is sent using the contact information from a single field. If the field contains multiple numbers, the message will only be sent to the first one.

- In the activity settings, clear the "Run as" field,
- Click on the three dots to the right of the field → open the "Element Fields" list → select the "Responsible" variable
6. Write a message that will go to the customers.
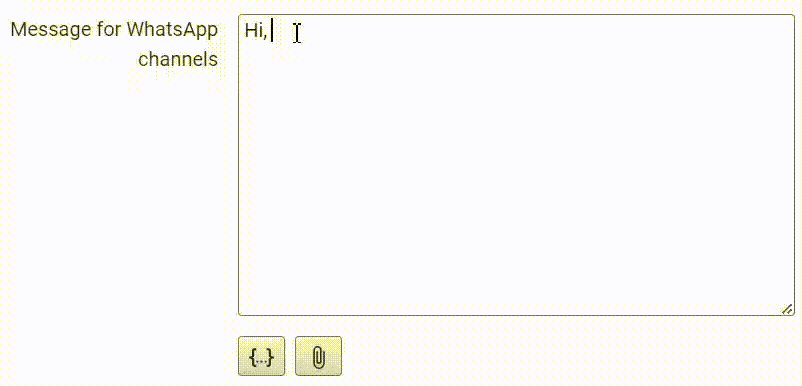
From a WhatsApp, Telegram or Viber channel, you can send a text message with an attached image, video, document.
You can add a variable from CRM to the message. For example, customer name or order number. To do this, click on the {...} button below the message field.
To find an exact variable without manual scrolling through the entire list, you can use the search. To do this, start typing in the upper empty line the name of the variable or CRM element, for example, "Name".
From a WABA channel, you can only send a template. The list will show all the templates that are available in your personal account.
Fill in the variables. This can be done manually, or you can substitute data from CRM. To automatically pull data from Bitrix into the message, click on the arrow next to the required variable → select the field from which you want to take information.
Attach a file if you have a template with media.

You can have both the message entry field for WhatsApp, Telegram or Viber channels and the list of WABA templates displayed. This happens if you have both types of channels, and want to send a message from the priority channel of the responsible one or to the last dialogue.
Fill in both fields. If the message will go from the WhatsApp, Telegram or Viber channel, Salesbot will recognize that you need to send the text from the "Message for WhatsApp, Telegram or Viber channel" field. If from the WABA channel — the bot will send the selected template. The messages will not go from two channels at once — only one.
7. Once you've entered the messages, click Save → the Business Process editor will open. There you need to click "Save" again.
The business process is ready. When a new deal is created, the client will receive a message.
3. Customer communication → Send SMS to customer → Add. After that, the window will be closed.

Although it is called "Send SMS to customer" the message will go to WhatsApp, Viber or Telegram depending on what you choose. This is how it is done in Bitrix
4. Find the automation you've added on the chosen stage → click "Change".

5. Set up the automation rule. Enter the text of the message. You can add an attachment to it, but only by link. For this:
a) Prepare a link to the file. Send the file via Wazzup chat to your number or customer number. The service will process the file and assign a link to it.
b) Right click on the image → copy the URL of the image.
c) Add a link to the message. Enclose all links in square brackets [ ]. It will turn out like this: [https://store.wazzup24.com/c4d2f98d9b3d75d1a8e8d760343c26cc66495ea4]
Select from the drop-down menu the type of customer number to which the message will be sent. You can change it on the contact card. If you select "Auto Select" the message will be sent to the first number specified in the contact card.
Select from the drop-down menu "Provider" → "Wazzup: WhatsApp message", "Wazzup: Viber message" or "Wazzup: Telegram message"
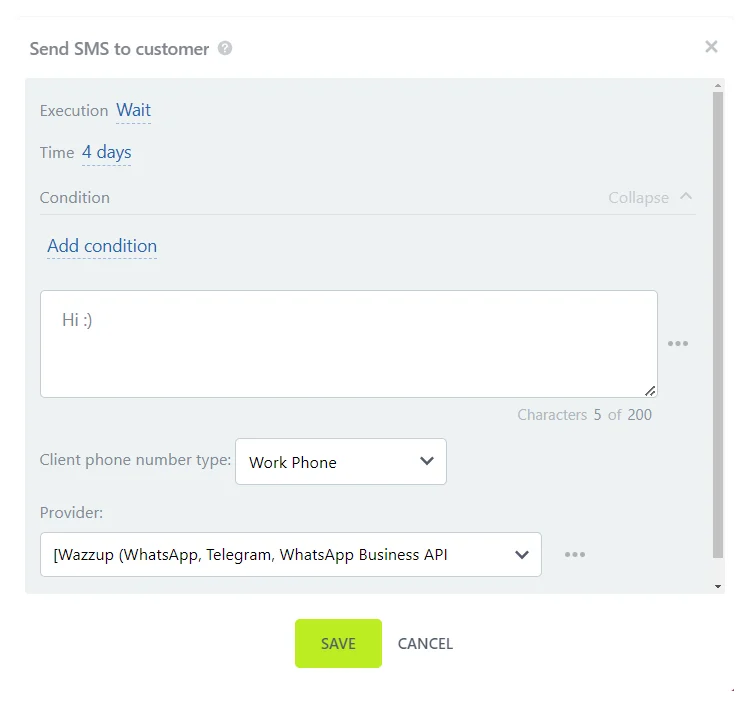
Click "Save."
6. Click "Save" again. Done!