
'%3e%3cpath%20d='M10%2020C15.5228%2020%2020%2015.5228%2020%2010C20%204.47715%2015.5228%200%2010%200C4.47715%200%200%204.47715%200%2010C0%2015.5228%204.47715%2020%2010%2020Z'%20fill='%23F0F0F0'/%3e%3cpath%20d='M19.378%2013.4785C19.78%2012.3951%2020%2011.2234%2020%2010.0002C20%208.77701%2019.78%207.60529%2019.378%206.52197H0.621992C0.220039%207.60529%200%208.77701%200%2010.0002C0%2011.2234%200.220039%2012.3951%200.621992%2013.4785L10%2014.348L19.378%2013.4785Z'%20fill='%230052B4'/%3e%3cpath%20d='M9.9991%2019.9998C14.2987%2019.9998%2017.9642%2017.286%2019.3771%2013.478H0.621094C2.03402%2017.286%205.69945%2019.9998%209.9991%2019.9998Z'%20fill='%23D80027'/%3e%3c/g%3e%3cdefs%3e%3cclipPath%20id='clip0_586_4336'%3e%3crect%20width='20'%20height='20'%20fill='white'/%3e%3c/clipPath%3e%3c/defs%3e%3c/svg%3e)
'%3e%3cpath%20d='M10%2020C15.5228%2020%2020%2015.5228%2020%2010C20%204.47715%2015.5228%200%2010%200C4.47715%200%200%204.47715%200%2010C0%2015.5228%204.47715%2020%2010%2020Z'%20fill='%23F0F0F0'/%3e%3cpath%20d='M9.56445%209.99982H19.9992C19.9992%209.09725%2019.8789%208.22287%2019.6547%207.39111H9.56445V9.99982Z'%20fill='%23D80027'/%3e%3cpath%20d='M9.56445%204.78254H18.5315C17.9193%203.78363%2017.1366%202.9007%2016.2241%202.17383H9.56445V4.78254Z'%20fill='%23D80027'/%3e%3cpath%20d='M9.99828%2020.0001C12.3518%2020.0001%2014.5149%2019.1866%2016.2231%2017.8262H3.77344C5.48164%2019.1866%207.6448%2020.0001%209.99828%2020.0001Z'%20fill='%23D80027'/%3e%3cpath%20d='M1.46699%2015.2171H18.5315C19.023%2014.4152%2019.4041%2013.5386%2019.6548%2012.6084H0.34375C0.594414%2013.5386%200.975547%2014.4152%201.46699%2015.2171Z'%20fill='%23D80027'/%3e%3cpath%20d='M4.63219%201.56164H5.54348L4.69582%202.17746L5.01961%203.17391L4.17199%202.55809L3.32437%203.17391L3.60406%202.31309C2.85773%202.93477%202.20359%203.66313%201.66453%204.47469H1.95652L1.41695%204.86668C1.33289%205.00691%201.25227%205.14937%201.175%205.29395L1.43266%206.08695L0.951953%205.7377C0.832461%205.99086%200.723164%206.24973%200.624922%206.51398L0.908789%207.38773H1.95652L1.10887%208.00356L1.43266%209L0.585039%208.38418L0.0773047%208.75309C0.0264844%209.1616%200%209.57769%200%2010H10C10%204.47719%2010%203.82609%2010%200C8.02453%200%206.18301%200.573047%204.63219%201.56164ZM5.01961%209L4.17199%208.38418L3.32437%209L3.64816%208.00356L2.80051%207.38773H3.84824L4.17199%206.39129L4.49574%207.38773H5.54348L4.69582%208.00356L5.01961%209ZM4.69582%205.09051L5.01961%206.08695L4.17199%205.47113L3.32437%206.08695L3.64816%205.09051L2.80051%204.47469H3.84824L4.17199%203.47824L4.49574%204.47469H5.54348L4.69582%205.09051ZM8.60656%209L7.75895%208.38418L6.91133%209L7.23512%208.00356L6.38746%207.38773H7.4352L7.75895%206.39129L8.0827%207.38773H9.13043L8.28277%208.00356L8.60656%209ZM8.28277%205.09051L8.60656%206.08695L7.75895%205.47113L6.91133%206.08695L7.23512%205.09051L6.38746%204.47469H7.4352L7.75895%203.47824L8.0827%204.47469H9.13043L8.28277%205.09051ZM8.28277%202.17746L8.60656%203.17391L7.75895%202.55809L6.91133%203.17391L7.23512%202.17746L6.38746%201.56164H7.4352L7.75895%200.565195L8.0827%201.56164H9.13043L8.28277%202.17746Z'%20fill='%230052B4'/%3e%3c/g%3e%3cdefs%3e%3cclipPath%20id='clip0_1008_13251'%3e%3crect%20width='20'%20height='20'%20fill='white'/%3e%3c/clipPath%3e%3c/defs%3e%3c/svg%3e)
'%3e%3cpath%20d='M10%2020C15.5228%2020%2020%2015.5228%2020%2010C20%204.47715%2015.5228%200%2010%200C4.47715%200%200%204.47715%200%2010C0%2015.5228%204.47715%2020%2010%2020Z'%20fill='%23F0F0F0'/%3e%3cpath%20d='M0.34375%2012.6089C1.26711%2016.0348%203.96465%2018.7324%207.39059%2019.6557V12.6089H0.34375Z'%20fill='%23D80027'/%3e%3cpath%20d='M7.39055%200.344727C3.96465%201.26805%201.26707%203.96562%200.34375%207.39152H7.39059V0.344727H7.39055Z'%20fill='%230052B4'/%3e%3cpath%20d='M19.6562%207.39152C18.7329%203.96562%2016.0353%201.26805%2012.6094%200.344727V7.39156H19.6562V7.39152Z'%20fill='%23D80027'/%3e%3cpath%20d='M12.6094%2019.6557C16.0353%2018.7324%2018.7329%2016.0348%2019.6562%2012.6089H12.6094V19.6557Z'%20fill='%230052B4'/%3e%3cpath%20d='M12.608%209.99982C12.608%2011.4406%2011.4401%2012.6085%209.99934%2012.6085C8.55859%2012.6085%207.39062%2011.4406%207.39062%209.99982C7.39062%208.55904%209.99934%207.39111%209.99934%207.39111C9.99934%207.39111%2012.608%208.55904%2012.608%209.99982Z'%20fill='%23496E2D'/%3e%3cpath%20d='M7.39062%209.99982C7.39062%208.55904%208.55859%207.39111%209.99934%207.39111C11.4401%207.39111%2012.608%208.55904%2012.608%209.99982'%20fill='%230052B4'/%3e%3cpath%20d='M8.5332%208.6958V10.3262C8.5332%2011.1367%209.19016%2011.7936%2010.0006%2011.7936C10.811%2011.7936%2011.468%2011.1367%2011.468%2010.3262V8.6958H8.5332Z'%20fill='%23D80027'/%3e%3c/g%3e%3cdefs%3e%3cclipPath%20id='clip0_1008_13324'%3e%3crect%20width='20'%20height='20'%20fill='white'/%3e%3c/clipPath%3e%3c/defs%3e%3c/svg%3e)


How to transfer a WABA number to Wazzup from another service
Transferring WhatsApp Business API (WABA) number from another service is not difficult, but it is important to do everything according to the instructions together with our support team.
You will need access to the WABA number and the Facebook account to which the Meta business account with the required WABA number is connected.
Step 1: Disable two-factor authentication on your WABA account
To do this, contact the support of the service where you worked with WABA.
Step 2. Add a channel according to these instructions
If you are transferring several channels and they belong to different WhatsApp Business accounts, first transfer those that are linked to the same WhatsApp Business account. And then those channels that are tied to another. It will be easier.
To find out which WhatsApp Business account has a WABA number attached to it, go to Facebook's WhatsApp Manager
1. Log in to the "Channels" section of your Wazzup account.
2. Click "Add Channel" → WhatsApp → WABA → Continue.
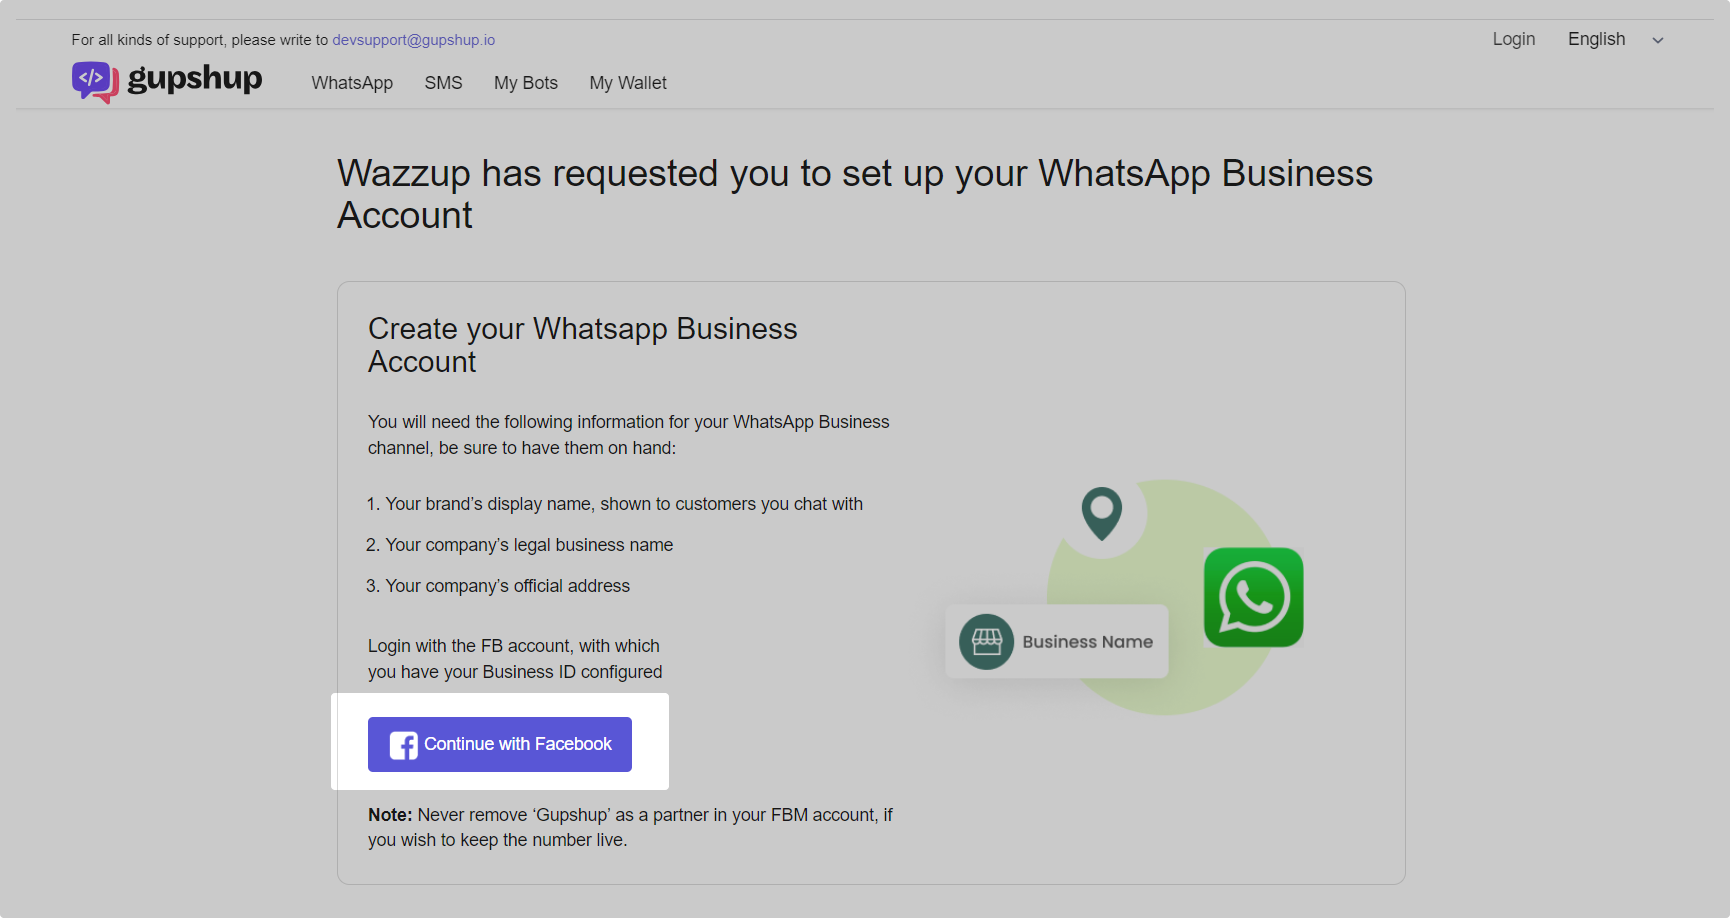
3. A new tab will open in your browser. Leave this tab open until the end of the connection — you need it at the end.
Click the blue "Continue with Facebook" button.
4. A new browser window with Facebook will open. Log in to the Facebook account to which the Meta business account with the desired WABA number is linked.
If nothing opens, check that:
- pop-ups are not blocked in your browser,
- extensions that change the appearance of the page are disabled. For example, translators or ad blockers.
5. Click "Get started".

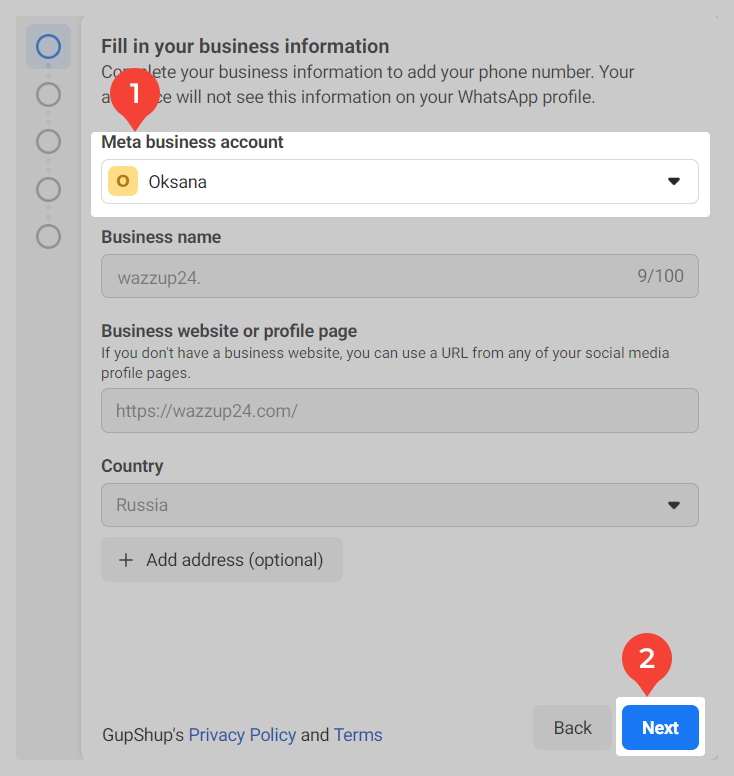
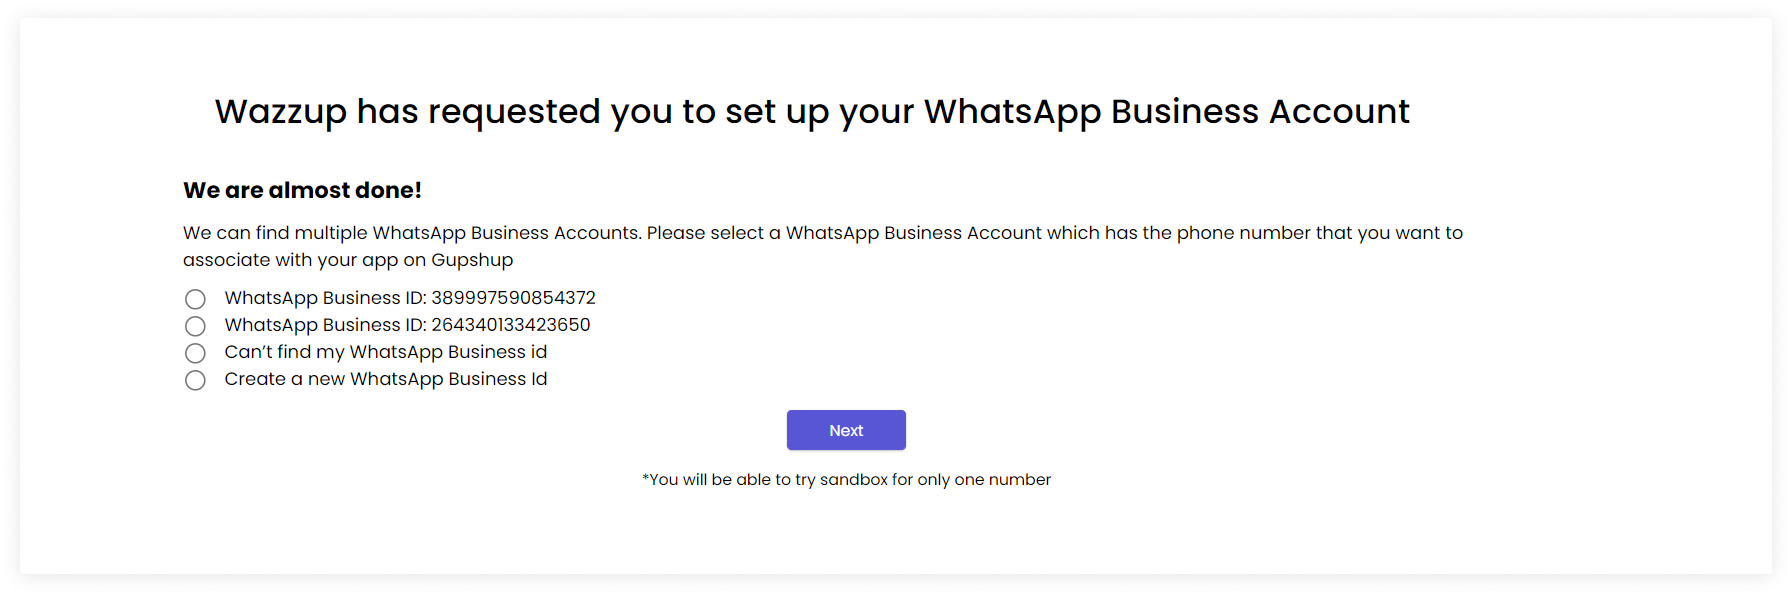
6. Select the Meta business account that is connected with the number you want to transfer to Wazzup → click "Next".
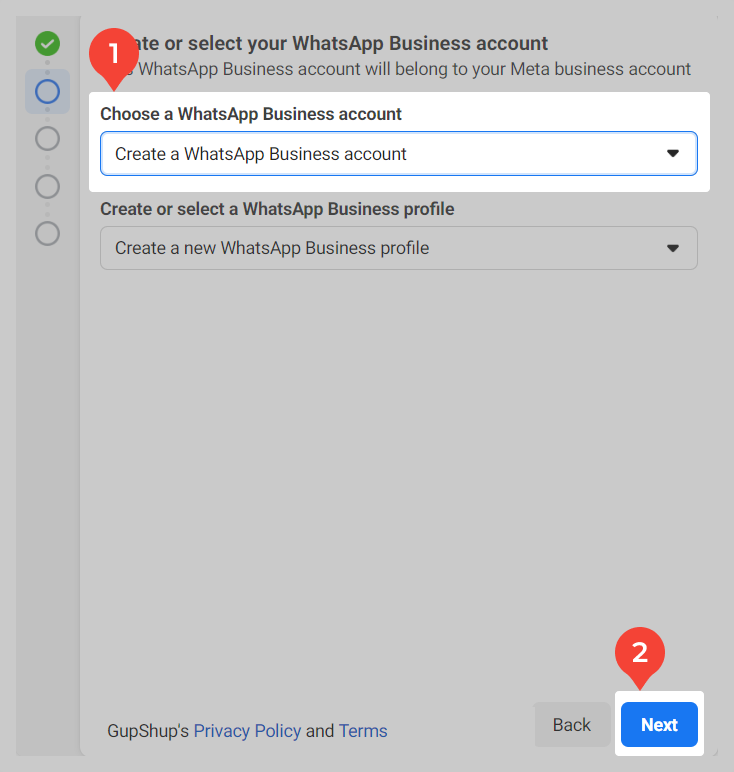
7. Click "Create a WhatsApp Business account" → Next.
Also at this step you need to know the IDs of already created WhatsApp Business accounts — these IDs will be useful later to distinguish WhatsApp Business accounts:
Click on the "Choose a WhatsApp Business account" box → a list of your WhatsApp Business accounts will appear — take a screenshot or photo and save it.
If you are transferring several channels that are linked to the same WhatsApp Business account and you have already transferred one of them — when you start transfer the others, chose the created WhatsApp Business account for the first of these channels.
In this case, a new WhatsApp profile is needed for each channel. That is, in the second field "Create or select a WhatsApp Business profile" leave the option "Create a new WhatsApp Business profile" while updating any channel
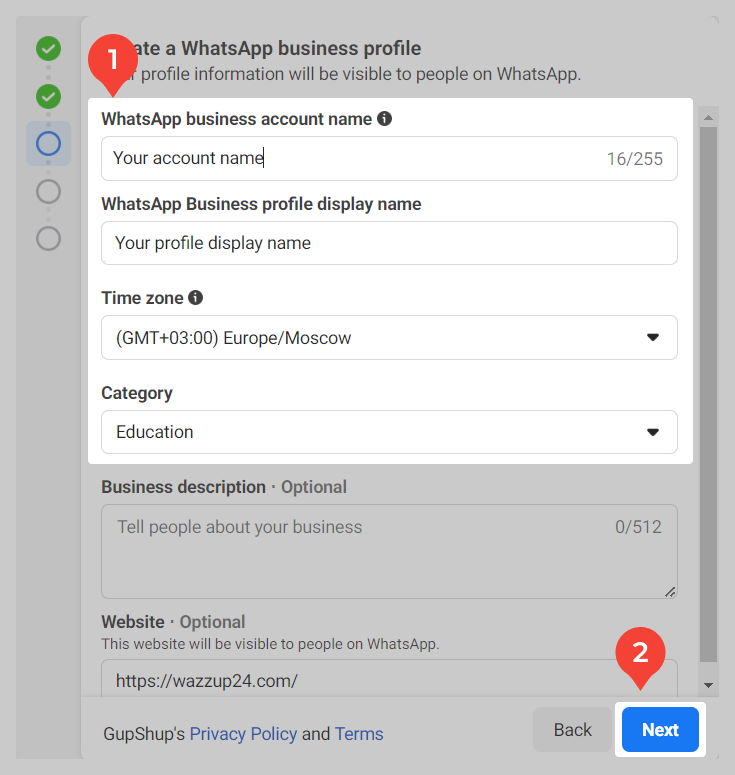
8. Fill in the company information.
The username and the displayed profile name must match the one you are using for your WhatsApp Business profile now. For example, if it was "BestCompany Support", it should be "BestCompany Support" now
Business description can be specified immediately, or you can specify it later in your personal Wazzup account.
9. A window for adding a number will open — select "Add new or existing number". Enter your WABA channel number and select the number confirmation method → click "Next".
Facebook will show a yellow warning that the number is already registered. Check that the phone with the WABA number is turned on and connected → press "Next".
10. Enter the code and click "Next" → then "Continue" → and "Finish".
11. The Facebook window will close. The tab that was open back at the beginning will remain on the screen. This one:
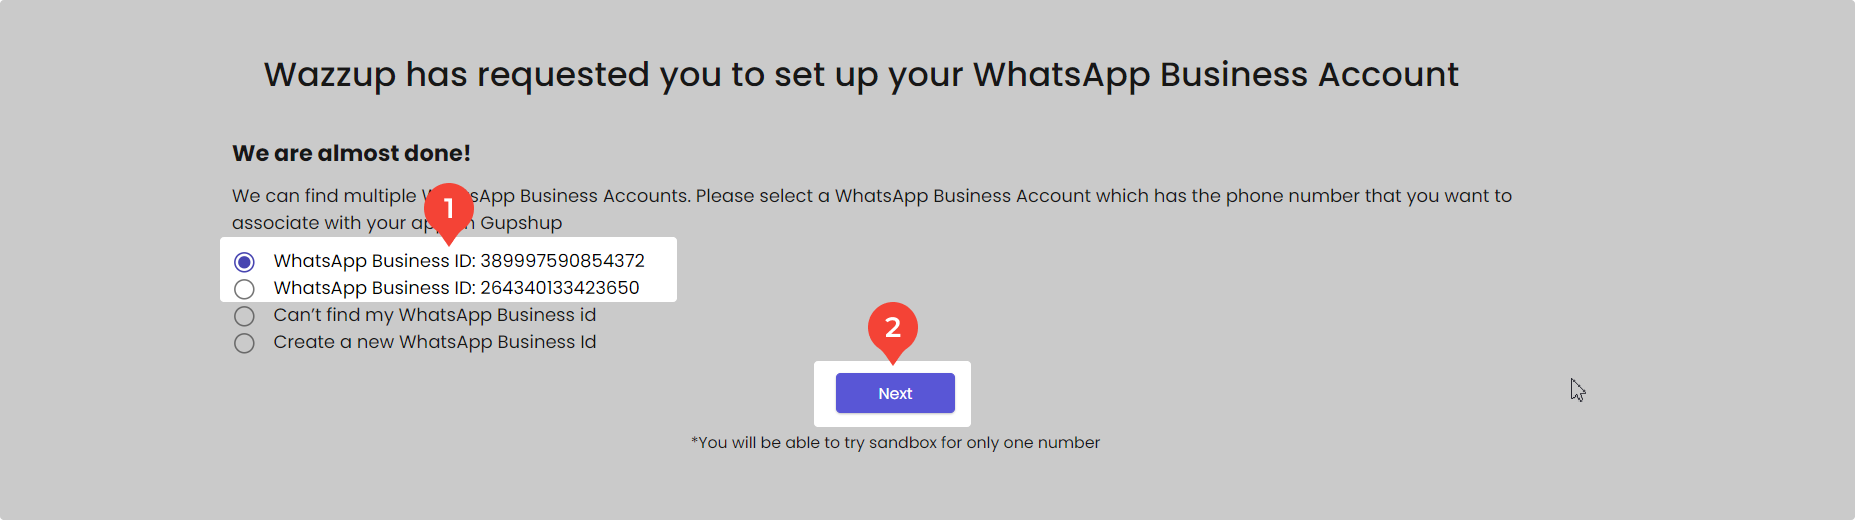
The tab will automatically refresh. A list of your WhatsApp Business accounts or a selection of numbers as in step 10 will appear on the screen.
Accounts are differentiated by ID. Select the new one you created in step five. To understand where it is, look at the screenshot with the list of WhatsApp Business accounts you created in the same fifth step. You need the account with the ID that is not in the screenshot.
When you have selected the account you want, click "Next".
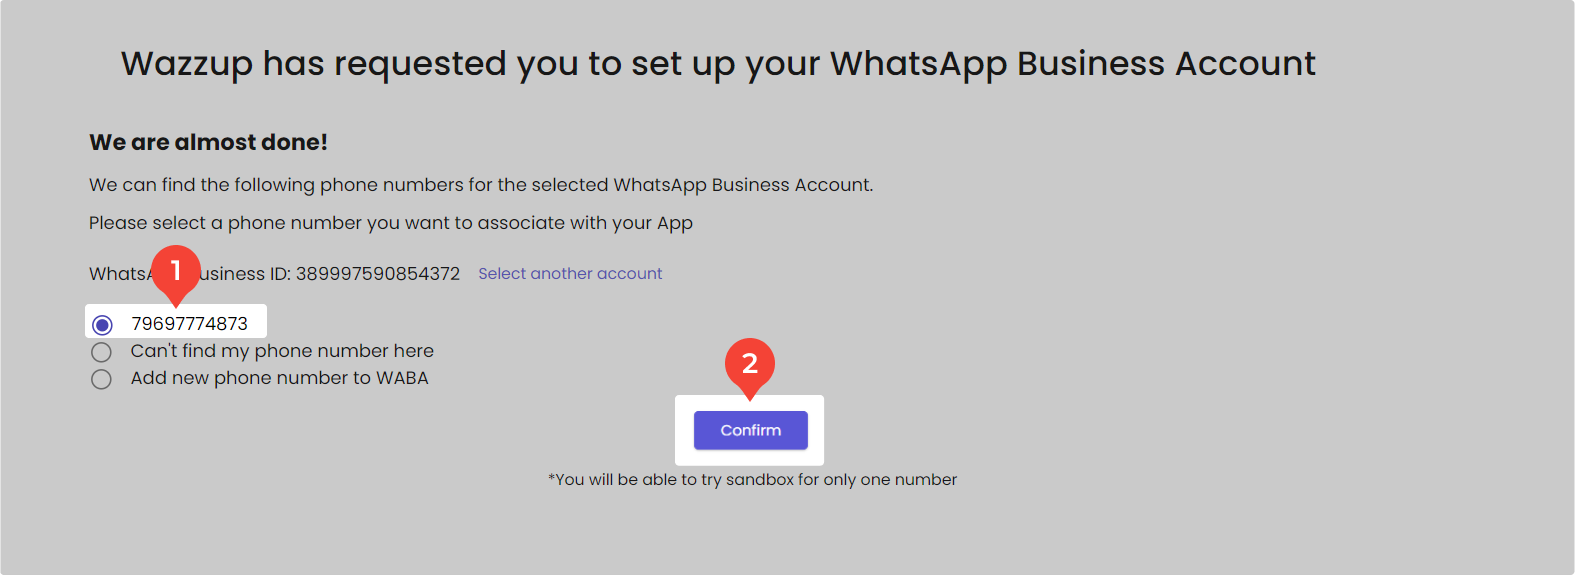
12. Select the phone number of your channel → press "Confirm" → and "Confirm" again.
13. You will see a loading screen:
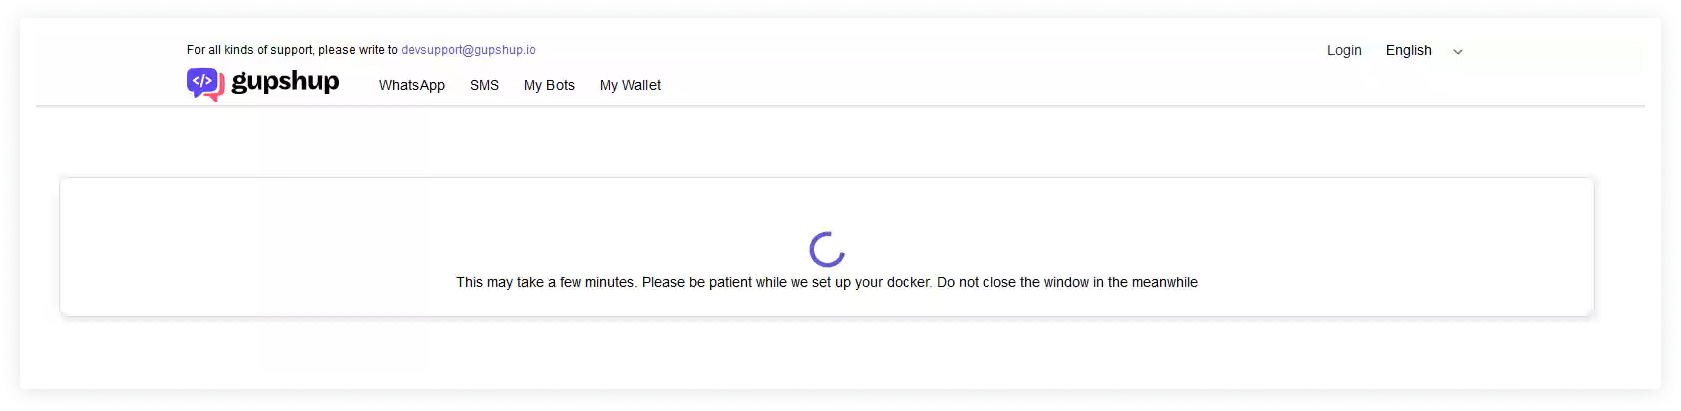
Wait for a notification that WABA is connected. Only then can you close the tab.
14. Done! In about 15 minutes the WABA channel will be in the "Active" status.