'%3e%3cpath%20d='M10%2020C15.5228%2020%2020%2015.5228%2020%2010C20%204.47715%2015.5228%200%2010%200C4.47715%200%200%204.47715%200%2010C0%2015.5228%204.47715%2020%2010%2020Z'%20fill='%23F0F0F0'/%3e%3cpath%20d='M19.378%2013.4785C19.78%2012.3951%2020%2011.2234%2020%2010.0002C20%208.77701%2019.78%207.60529%2019.378%206.52197H0.621992C0.220039%207.60529%200%208.77701%200%2010.0002C0%2011.2234%200.220039%2012.3951%200.621992%2013.4785L10%2014.348L19.378%2013.4785Z'%20fill='%230052B4'/%3e%3cpath%20d='M9.9991%2019.9998C14.2987%2019.9998%2017.9642%2017.286%2019.3771%2013.478H0.621094C2.03402%2017.286%205.69945%2019.9998%209.9991%2019.9998Z'%20fill='%23D80027'/%3e%3c/g%3e%3cdefs%3e%3cclipPath%20id='clip0_586_4336'%3e%3crect%20width='20'%20height='20'%20fill='white'/%3e%3c/clipPath%3e%3c/defs%3e%3c/svg%3e)
'%3e%3cpath%20d='M10%2020C15.5228%2020%2020%2015.5228%2020%2010C20%204.47715%2015.5228%200%2010%200C4.47715%200%200%204.47715%200%2010C0%2015.5228%204.47715%2020%2010%2020Z'%20fill='%23F0F0F0'/%3e%3cpath%20d='M9.56445%209.99982H19.9992C19.9992%209.09725%2019.8789%208.22287%2019.6547%207.39111H9.56445V9.99982Z'%20fill='%23D80027'/%3e%3cpath%20d='M9.56445%204.78254H18.5315C17.9193%203.78363%2017.1366%202.9007%2016.2241%202.17383H9.56445V4.78254Z'%20fill='%23D80027'/%3e%3cpath%20d='M9.99828%2020.0001C12.3518%2020.0001%2014.5149%2019.1866%2016.2231%2017.8262H3.77344C5.48164%2019.1866%207.6448%2020.0001%209.99828%2020.0001Z'%20fill='%23D80027'/%3e%3cpath%20d='M1.46699%2015.2171H18.5315C19.023%2014.4152%2019.4041%2013.5386%2019.6548%2012.6084H0.34375C0.594414%2013.5386%200.975547%2014.4152%201.46699%2015.2171Z'%20fill='%23D80027'/%3e%3cpath%20d='M4.63219%201.56164H5.54348L4.69582%202.17746L5.01961%203.17391L4.17199%202.55809L3.32437%203.17391L3.60406%202.31309C2.85773%202.93477%202.20359%203.66313%201.66453%204.47469H1.95652L1.41695%204.86668C1.33289%205.00691%201.25227%205.14937%201.175%205.29395L1.43266%206.08695L0.951953%205.7377C0.832461%205.99086%200.723164%206.24973%200.624922%206.51398L0.908789%207.38773H1.95652L1.10887%208.00356L1.43266%209L0.585039%208.38418L0.0773047%208.75309C0.0264844%209.1616%200%209.57769%200%2010H10C10%204.47719%2010%203.82609%2010%200C8.02453%200%206.18301%200.573047%204.63219%201.56164ZM5.01961%209L4.17199%208.38418L3.32437%209L3.64816%208.00356L2.80051%207.38773H3.84824L4.17199%206.39129L4.49574%207.38773H5.54348L4.69582%208.00356L5.01961%209ZM4.69582%205.09051L5.01961%206.08695L4.17199%205.47113L3.32437%206.08695L3.64816%205.09051L2.80051%204.47469H3.84824L4.17199%203.47824L4.49574%204.47469H5.54348L4.69582%205.09051ZM8.60656%209L7.75895%208.38418L6.91133%209L7.23512%208.00356L6.38746%207.38773H7.4352L7.75895%206.39129L8.0827%207.38773H9.13043L8.28277%208.00356L8.60656%209ZM8.28277%205.09051L8.60656%206.08695L7.75895%205.47113L6.91133%206.08695L7.23512%205.09051L6.38746%204.47469H7.4352L7.75895%203.47824L8.0827%204.47469H9.13043L8.28277%205.09051ZM8.28277%202.17746L8.60656%203.17391L7.75895%202.55809L6.91133%203.17391L7.23512%202.17746L6.38746%201.56164H7.4352L7.75895%200.565195L8.0827%201.56164H9.13043L8.28277%202.17746Z'%20fill='%230052B4'/%3e%3c/g%3e%3cdefs%3e%3cclipPath%20id='clip0_1008_13251'%3e%3crect%20width='20'%20height='20'%20fill='white'/%3e%3c/clipPath%3e%3c/defs%3e%3c/svg%3e)
'%3e%3cpath%20d='M10%2020C15.5228%2020%2020%2015.5228%2020%2010C20%204.47715%2015.5228%200%2010%200C4.47715%200%200%204.47715%200%2010C0%2015.5228%204.47715%2020%2010%2020Z'%20fill='%23F0F0F0'/%3e%3cpath%20d='M0.34375%2012.6089C1.26711%2016.0348%203.96465%2018.7324%207.39059%2019.6557V12.6089H0.34375Z'%20fill='%23D80027'/%3e%3cpath%20d='M7.39055%200.344727C3.96465%201.26805%201.26707%203.96562%200.34375%207.39152H7.39059V0.344727H7.39055Z'%20fill='%230052B4'/%3e%3cpath%20d='M19.6562%207.39152C18.7329%203.96562%2016.0353%201.26805%2012.6094%200.344727V7.39156H19.6562V7.39152Z'%20fill='%23D80027'/%3e%3cpath%20d='M12.6094%2019.6557C16.0353%2018.7324%2018.7329%2016.0348%2019.6562%2012.6089H12.6094V19.6557Z'%20fill='%230052B4'/%3e%3cpath%20d='M12.608%209.99982C12.608%2011.4406%2011.4401%2012.6085%209.99934%2012.6085C8.55859%2012.6085%207.39062%2011.4406%207.39062%209.99982C7.39062%208.55904%209.99934%207.39111%209.99934%207.39111C9.99934%207.39111%2012.608%208.55904%2012.608%209.99982Z'%20fill='%23496E2D'/%3e%3cpath%20d='M7.39062%209.99982C7.39062%208.55904%208.55859%207.39111%209.99934%207.39111C11.4401%207.39111%2012.608%208.55904%2012.608%209.99982'%20fill='%230052B4'/%3e%3cpath%20d='M8.5332%208.6958V10.3262C8.5332%2011.1367%209.19016%2011.7936%2010.0006%2011.7936C10.811%2011.7936%2011.468%2011.1367%2011.468%2010.3262V8.6958H8.5332Z'%20fill='%23D80027'/%3e%3c/g%3e%3cdefs%3e%3cclipPath%20id='clip0_1008_13324'%3e%3crect%20width='20'%20height='20'%20fill='white'/%3e%3c/clipPath%3e%3c/defs%3e%3c/svg%3e)


How to send a broadcast message from Kommo
In the article, we described the way to send marketing messages. It will turn out to write to new contacts and those with whom there is already correspondence. The message will go where you choose, you'll be able to track who is interested in the offer.
Remember that your account can get banned for messaging campaigns. So we recommend you to read our articles on how to avoid being blocked in different messengers, and then take up broadcasts:
If you plan to send messaging campaigns often, we recommend switching to the official WhatsApp — WABA. The probability of getting your WABA account blocked is minimal, unlike Telegram and WhatsApp
For such messages, you need Salesbot — this is a bot that can perform various automatic actions.
We will analyze the bot setup using an example. Let's imagine that we are:
- writing on WhatsApp
- sending messages to the database of customers who left a request, but did not buy anything,
- talking about the promotion,
- sending a message as soon as we set up the bot.
Step 1. Choose the conditions under which the message will go to the client
1. Go to "Leads" → open the necessary funnel → click "Automate" in the upper right corner.
2. Click on an empty cell under the stage at which you want to send messages — this is how we will create a trigger.
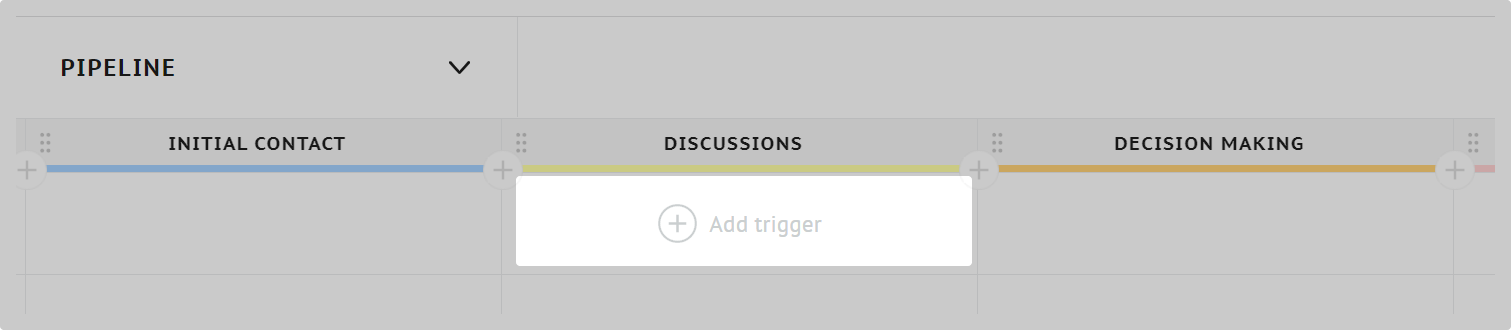
3. Select Salesbot — it will be the first on the list.
4. Select the conditions under which the message should leave.
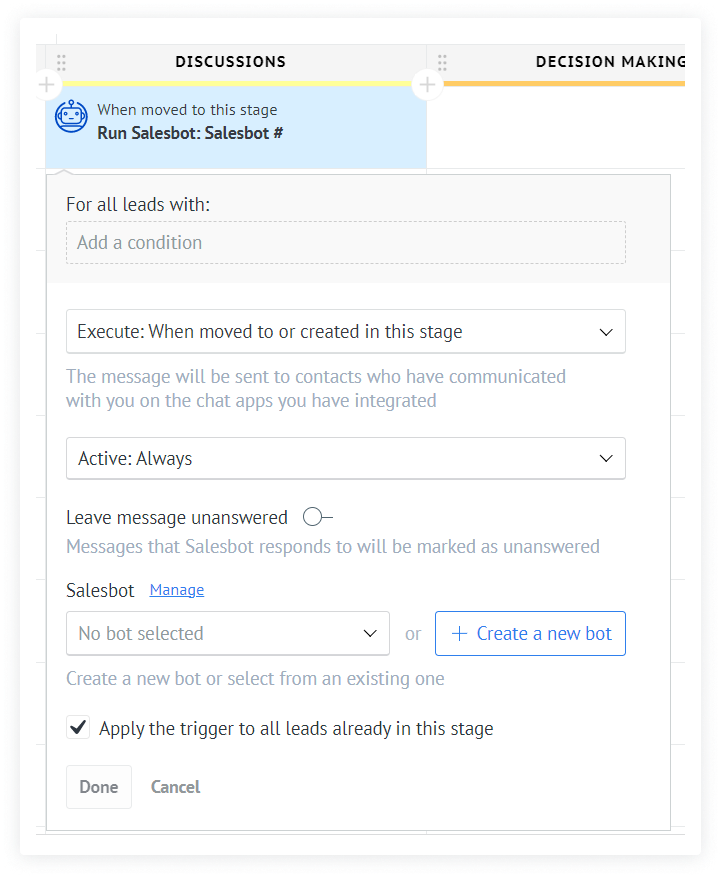
The field "For all leads with". If you want to write to all contacts at the stage, leave the field empty.
The "Execute" field. Select "When moved to or created in this stage".
The field "Active: Always" can stay the same.
Select "Apply trigger to all leads in this status". So the messaging campaign will go to everyone on the stage.
Click "+Create a new bot".
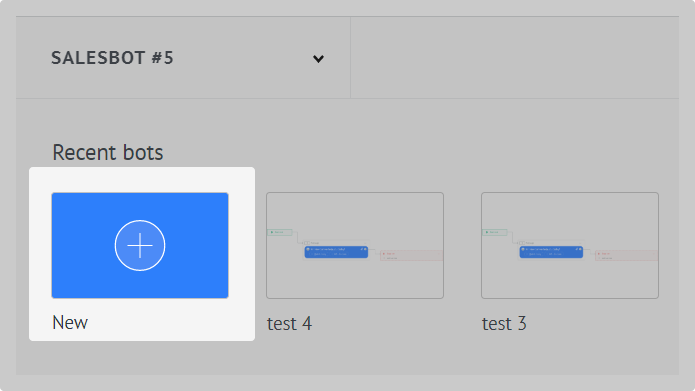
5. In the "Recent bots" panel, select "New". The bot editor will open.

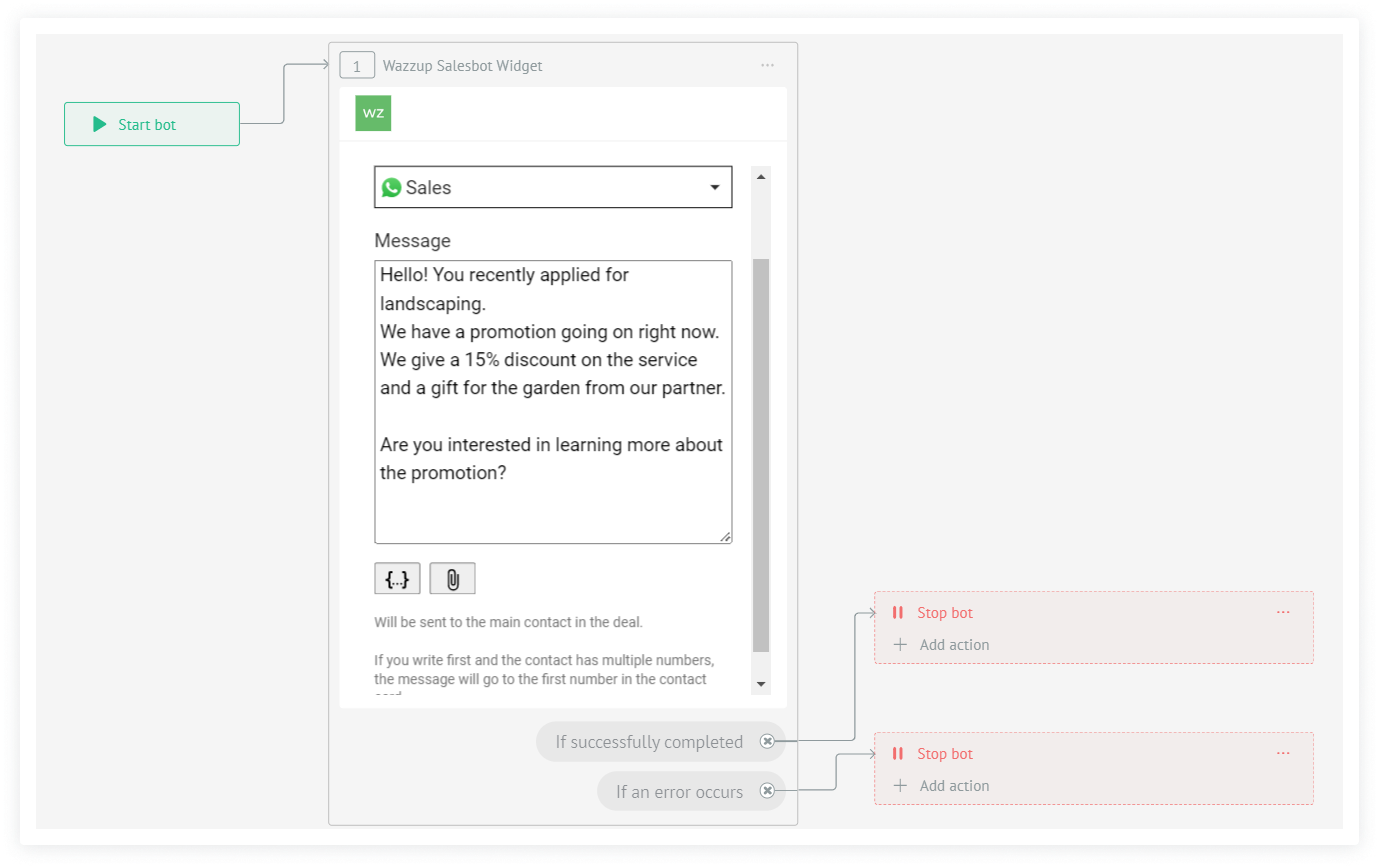
Step 2. Add a message that will go to customers
Create a bot according to the instructions that will send a message. As the next step for both "If an error occurs" and "If successfully completed" select "Stop bot".
We got a bot, as in the screenshot below.
Step 3. Specify what should happen when the client answers
When you save the bot with the message, you will be back in the funnel settings.
In this step, we ensure that after the client's response, the bot performs the necessary action. For example, it moved the lead to another stage or created a task for the manager.
1. Click on the cell below the broadcast bot → select Salesbot.

2. Fill in the trigger conditions.
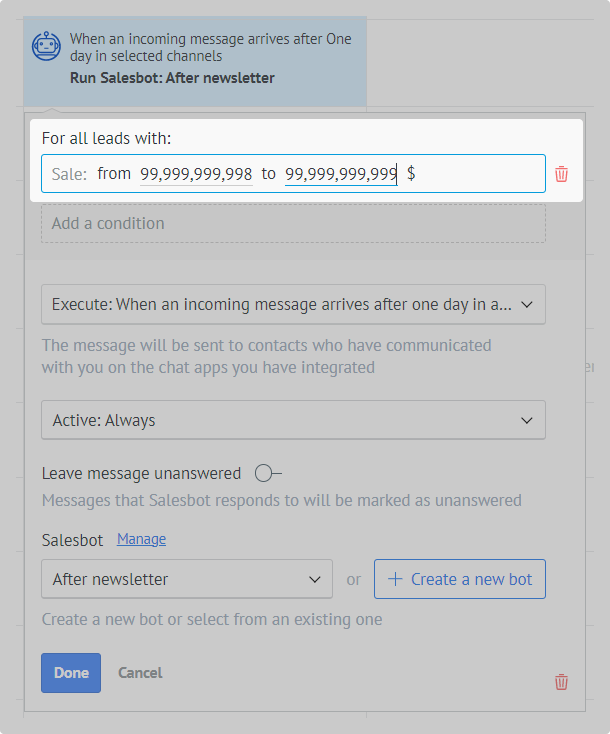
In the "Executive" field, specify "When an incoming message arrives after One day in any channel".
Click "+Create a new bot".

3. In the "Recent bots" panel, select "New". The bot editor will open.
4. In the "Add next step" modal window, select "Action".
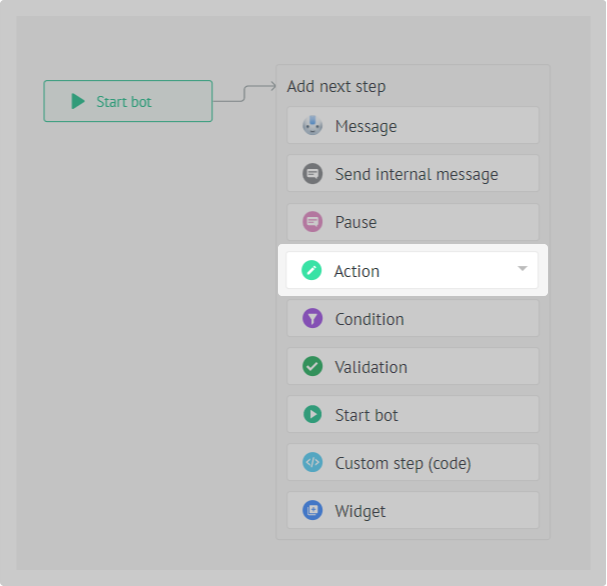
Specify the action that the bot needs to take. In our example, we will assign the salesperson the task of contacting the customer. After the conversation, he will decide how to proceed with the lead.
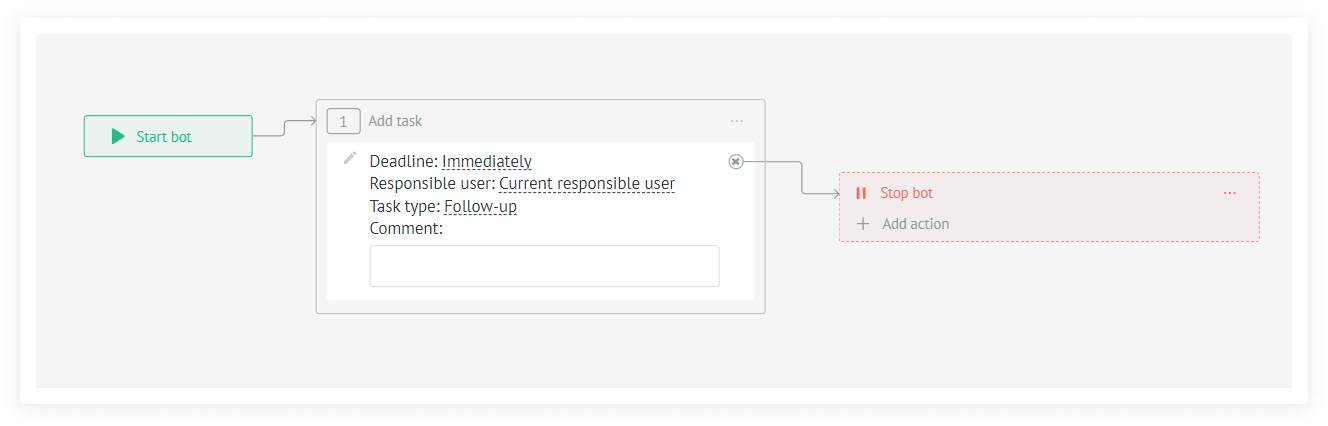
The next step is to select "Stop bot".
5. Click "Save" in the upper right corner. The bot editor will close.
6. In the trigger settings, click "Done".
7. In the upper right corner, click "Save" — the messaging campaign will go to customers.
How the messaging campaign is sent
Messages do not go immediately but in turn. If you have a lot of contacts, it may seem that the broadcast is stuck. In fact, the messages are left but you have to wait.
If suddenly one of the clients does not get the message, you will receive an error notification. It will say what went wrong.
What to do with bots after broadcast
If you want the messaging campaign to be sent to all customers who have moved to the stage with the bot, you can leave it as is. As soon as the lead is at the stage with the bot, a message will go to the client.
If you no longer send marketing messages, you can:
- or remove both triggers from the funnel,
- or prescribe the conditions under which the broadcast will not be able to go to customers.
If you remove both triggers from the funnel, the bots themselves will remain in drafts. If you want to send it out again, you can create a new trigger and use the bot you built earlier.
To delete a trigger, click on it → click on the red trash icon in the lower right corner of the trigger settings.
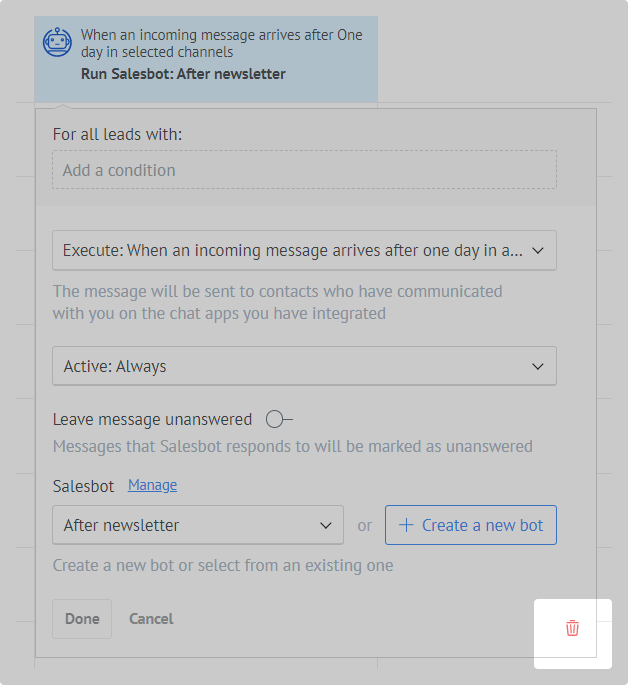
If you specify such a condition for the trigger to work, which will not match any lead, there will be no one to leave the message. The condition from the screenshot below will do. Unless you sell yachts and luxury real estate, of course.