
'%3e%3cpath%20d='M10%2020C15.5228%2020%2020%2015.5228%2020%2010C20%204.47715%2015.5228%200%2010%200C4.47715%200%200%204.47715%200%2010C0%2015.5228%204.47715%2020%2010%2020Z'%20fill='%23F0F0F0'/%3e%3cpath%20d='M19.378%2013.4785C19.78%2012.3951%2020%2011.2234%2020%2010.0002C20%208.77701%2019.78%207.60529%2019.378%206.52197H0.621992C0.220039%207.60529%200%208.77701%200%2010.0002C0%2011.2234%200.220039%2012.3951%200.621992%2013.4785L10%2014.348L19.378%2013.4785Z'%20fill='%230052B4'/%3e%3cpath%20d='M9.9991%2019.9998C14.2987%2019.9998%2017.9642%2017.286%2019.3771%2013.478H0.621094C2.03402%2017.286%205.69945%2019.9998%209.9991%2019.9998Z'%20fill='%23D80027'/%3e%3c/g%3e%3cdefs%3e%3cclipPath%20id='clip0_586_4336'%3e%3crect%20width='20'%20height='20'%20fill='white'/%3e%3c/clipPath%3e%3c/defs%3e%3c/svg%3e)
'%3e%3cpath%20d='M10%2020C15.5228%2020%2020%2015.5228%2020%2010C20%204.47715%2015.5228%200%2010%200C4.47715%200%200%204.47715%200%2010C0%2015.5228%204.47715%2020%2010%2020Z'%20fill='%23F0F0F0'/%3e%3cpath%20d='M9.56445%209.99982H19.9992C19.9992%209.09725%2019.8789%208.22287%2019.6547%207.39111H9.56445V9.99982Z'%20fill='%23D80027'/%3e%3cpath%20d='M9.56445%204.78254H18.5315C17.9193%203.78363%2017.1366%202.9007%2016.2241%202.17383H9.56445V4.78254Z'%20fill='%23D80027'/%3e%3cpath%20d='M9.99828%2020.0001C12.3518%2020.0001%2014.5149%2019.1866%2016.2231%2017.8262H3.77344C5.48164%2019.1866%207.6448%2020.0001%209.99828%2020.0001Z'%20fill='%23D80027'/%3e%3cpath%20d='M1.46699%2015.2171H18.5315C19.023%2014.4152%2019.4041%2013.5386%2019.6548%2012.6084H0.34375C0.594414%2013.5386%200.975547%2014.4152%201.46699%2015.2171Z'%20fill='%23D80027'/%3e%3cpath%20d='M4.63219%201.56164H5.54348L4.69582%202.17746L5.01961%203.17391L4.17199%202.55809L3.32437%203.17391L3.60406%202.31309C2.85773%202.93477%202.20359%203.66313%201.66453%204.47469H1.95652L1.41695%204.86668C1.33289%205.00691%201.25227%205.14937%201.175%205.29395L1.43266%206.08695L0.951953%205.7377C0.832461%205.99086%200.723164%206.24973%200.624922%206.51398L0.908789%207.38773H1.95652L1.10887%208.00356L1.43266%209L0.585039%208.38418L0.0773047%208.75309C0.0264844%209.1616%200%209.57769%200%2010H10C10%204.47719%2010%203.82609%2010%200C8.02453%200%206.18301%200.573047%204.63219%201.56164ZM5.01961%209L4.17199%208.38418L3.32437%209L3.64816%208.00356L2.80051%207.38773H3.84824L4.17199%206.39129L4.49574%207.38773H5.54348L4.69582%208.00356L5.01961%209ZM4.69582%205.09051L5.01961%206.08695L4.17199%205.47113L3.32437%206.08695L3.64816%205.09051L2.80051%204.47469H3.84824L4.17199%203.47824L4.49574%204.47469H5.54348L4.69582%205.09051ZM8.60656%209L7.75895%208.38418L6.91133%209L7.23512%208.00356L6.38746%207.38773H7.4352L7.75895%206.39129L8.0827%207.38773H9.13043L8.28277%208.00356L8.60656%209ZM8.28277%205.09051L8.60656%206.08695L7.75895%205.47113L6.91133%206.08695L7.23512%205.09051L6.38746%204.47469H7.4352L7.75895%203.47824L8.0827%204.47469H9.13043L8.28277%205.09051ZM8.28277%202.17746L8.60656%203.17391L7.75895%202.55809L6.91133%203.17391L7.23512%202.17746L6.38746%201.56164H7.4352L7.75895%200.565195L8.0827%201.56164H9.13043L8.28277%202.17746Z'%20fill='%230052B4'/%3e%3c/g%3e%3cdefs%3e%3cclipPath%20id='clip0_1008_13251'%3e%3crect%20width='20'%20height='20'%20fill='white'/%3e%3c/clipPath%3e%3c/defs%3e%3c/svg%3e)
'%3e%3cpath%20d='M10%2020C15.5228%2020%2020%2015.5228%2020%2010C20%204.47715%2015.5228%200%2010%200C4.47715%200%200%204.47715%200%2010C0%2015.5228%204.47715%2020%2010%2020Z'%20fill='%23F0F0F0'/%3e%3cpath%20d='M0.34375%2012.6089C1.26711%2016.0348%203.96465%2018.7324%207.39059%2019.6557V12.6089H0.34375Z'%20fill='%23D80027'/%3e%3cpath%20d='M7.39055%200.344727C3.96465%201.26805%201.26707%203.96562%200.34375%207.39152H7.39059V0.344727H7.39055Z'%20fill='%230052B4'/%3e%3cpath%20d='M19.6562%207.39152C18.7329%203.96562%2016.0353%201.26805%2012.6094%200.344727V7.39156H19.6562V7.39152Z'%20fill='%23D80027'/%3e%3cpath%20d='M12.6094%2019.6557C16.0353%2018.7324%2018.7329%2016.0348%2019.6562%2012.6089H12.6094V19.6557Z'%20fill='%230052B4'/%3e%3cpath%20d='M12.608%209.99982C12.608%2011.4406%2011.4401%2012.6085%209.99934%2012.6085C8.55859%2012.6085%207.39062%2011.4406%207.39062%209.99982C7.39062%208.55904%209.99934%207.39111%209.99934%207.39111C9.99934%207.39111%2012.608%208.55904%2012.608%209.99982Z'%20fill='%23496E2D'/%3e%3cpath%20d='M7.39062%209.99982C7.39062%208.55904%208.55859%207.39111%209.99934%207.39111C11.4401%207.39111%2012.608%208.55904%2012.608%209.99982'%20fill='%230052B4'/%3e%3cpath%20d='M8.5332%208.6958V10.3262C8.5332%2011.1367%209.19016%2011.7936%2010.0006%2011.7936C10.811%2011.7936%2011.468%2011.1367%2011.468%2010.3262V8.6958H8.5332Z'%20fill='%23D80027'/%3e%3c/g%3e%3cdefs%3e%3cclipPath%20id='clip0_1008_13324'%3e%3crect%20width='20'%20height='20'%20fill='white'/%3e%3c/clipPath%3e%3c/defs%3e%3c/svg%3e)


How to connect Instagram API
In Wazzup, you can only connect Instagram API — the official solution without bans or proxies. Simply add a channel and communicate with customers in DMs and under posts.
To connect an Instagram API channel, you will need:
- a personal Facebook account,
- an Instagram Business account,
- a Facebook Business Page,
- a Meta Business Portfolio.
In this guide, we explain what these are and how to create them. If you don't have something yet, you'll set it up along the way. In the end, you'll have this connection: Instagram Business account → Facebook Business Page created from your personal Facebook account → Meta Business Portfolio, also created from your personal Facebook account.
- Step 1. Switch your Instagram account to a business account
- Step 2. Create a Meta business portfolio
- Step 3. Create a Facebook business page
- Step 4. Link the Facebook business page to the business portfolio
- Step 5. Link the Instagram business account to the Facebook business page
- Step 6. Connect Instagram to Wazzup
Step 1. Switch your Instagram account to a business account
There are several types of Instagram accounts: personal account, creator account, and business account. For connection, a business account is required.
1. Go to your Instagram profile page. Tap the menu icon (three horizontal lines) in the top right corner.
2. Tap "Settings and privacy" → near the bottom of the page "Account type and tools" → "Switch to professional account" → tap "Continue" several times.

3. Select a category for your business account → "Done".
4. Select the type of professional account — "Business" and tap "Next".
5. Review your contact information → "Next".
6. If a window appears offering to connect to the Accounts Center, tap "Not now". This is not needed for the channel.
Step 2. Create a Meta business portfolio
1. Go to Meta Business Suite and log in to your Facebook account.
2. In the top left corner, click the dropdown list → click "Create business portfolio".

3. Fill in the fields:
- Business portfolio name — official company name without special characters.
- Company owner name.
- Corporate email for communication with Meta. Will not be visible to customers.
4. Click "Create". In a few minutes, an email from Meta will arrive at the specified address. Follow the link to confirm.
Step 3. Create a Facebook business page
A Facebook business page is a public company profile for communicating with your audience and promoting products.
If you don't have a business page yet:
1. In Meta Business Suite, open the "Accounts" section → Pages → click "+Add" in the right corner.

2. In the list that opens, click "Create a new Facebook page".
3. Fill in the information requested by Facebook → click "Create page".
Step 4. Link the Facebook business page to the business portfolio
If you created the page following the instructions in step 3 — skip this step. The page is already linked.
If you had your own page and it's not yet linked to the portfolio:
1. In Meta Business Suite, open the "Accounts" section → Pages → click "+Add" in the right corner.
2. In the list that opens, click "Add an existing Facebook page".
3. In the window that opens, find your page by name or provide the page link.
Click "Next" → "Next" again → agree to Meta's policies and click "Claim page".

A notification of successful connection will appear.
Step 5. Link the Instagram business account to the Facebook business page
Your Facebook business page is now displayed in the "Accounts" section of Meta Business Suite → on the "Pages" tab.
1. Click "Connect assets" → Instagram account → log in to Instagram.

2. Leave the toggle "Allow access to Instagram messages in Inbox" turned on. Click "Confirm".
If you accidentally turned off this setting, in the Instagram app on your phone, go to "Settings and privacy" → "Messages and story replies" → "Message controls" → at the very bottom, turn on the "Allow access to messages" slider.

3. If a new tab opens to log in to Instagram, log in to the account you are linking.
Wait a moment. A notification will appear that everything is ready.
Step 6. Connect Instagram to Wazzup
1. Go to the "Channels" section of your Wazzup personal account.
2. Click "Add channel" and select Instagram.
3. Click "Log In". A new window with Facebook will open.
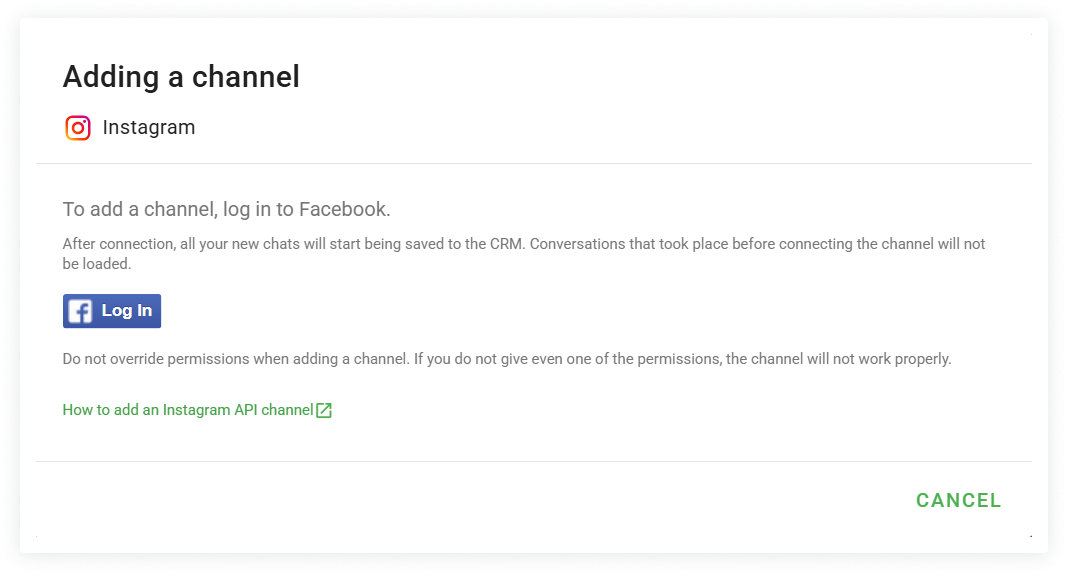
4. Select a Facebook profile or log in using your username and password.
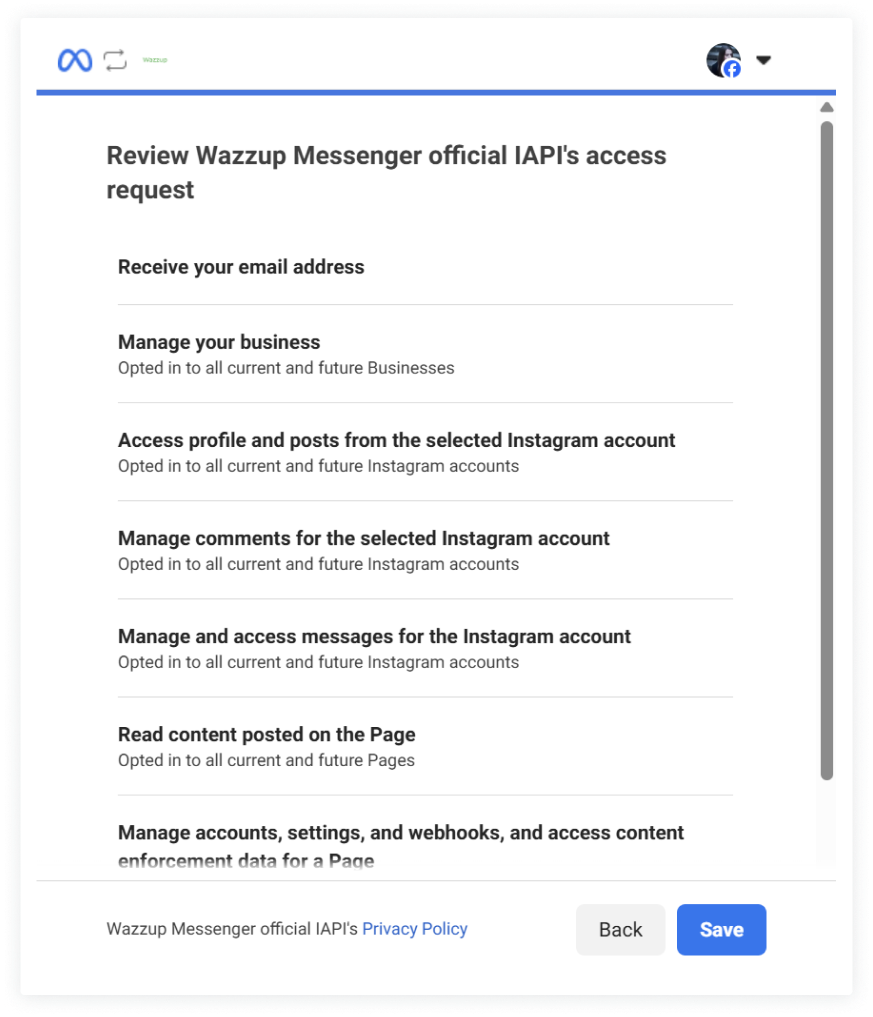
5. In the next three steps, Facebook will ask you to allow Wazzup access to:
- Facebook pages,
- business portfolios,
- Instagram accounts.
You can grant access to all items as shown in the screenshot below, or only to some. The main thing is to allow access to the Instagram account you are connecting, as well as the associated Facebook page and business portfolio.
After selecting the items at each step, click "Continue".

6. A list of required permissions for Wazzup will be displayed → click "Save" → click "Got it".
7. Return to the Wazzup personal account tab. Select the Instagram account for which you need to create a channel and click "Add".

After adding, Instagram will appear in the list of channels. You will start receiving messages from DMs and comments under posts.
To prevent sales reps from being distracted by spam and to avoid creating "junk" deals in the CRM — set up a comment filter or disable receiving them.
👉 How to configure comments in Instagram
If you need to add multiple channels — click the green "Add channel" button again and select the next account.